Snowflake Embroidery Pattern for Winter Hoops and Ornaments
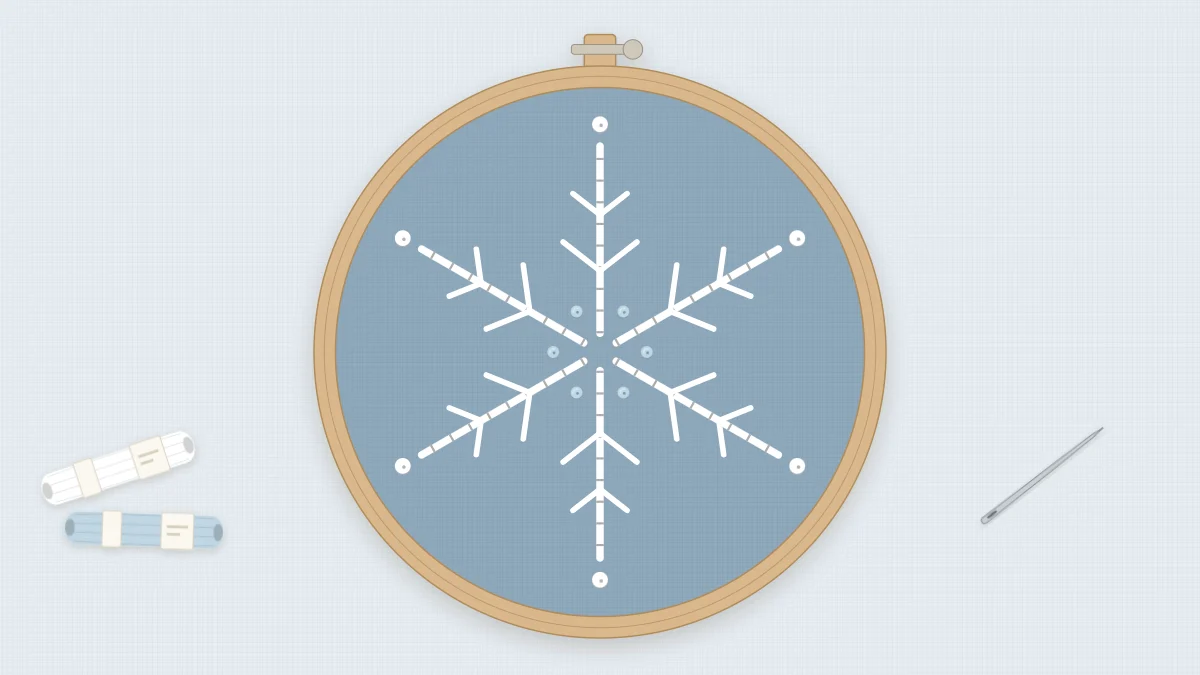
An original six-armed snowflake in white and pale blue for a 4-inch hoop or a felt ornament, made with backstitch, fly stitch, and French knots.
Tutorial at a glance
Materials
- 4-inch (10 cm) embroidery hoop
- Dusty blue, gray, or navy cotton, about 7 in (18 cm) square, or felt for ornaments
- Six-strand cotton floss in white and pale blue
- Embroidery needle
- White marking pencil, light-colored transfer paper, or water-soluble stabilizer
- Ruler
- Small sharp scissors
White thread on a dark blue ground does most of the work in this design. The snowflake itself is nothing more than straight lines and knots, which makes it a comfortable first pattern for a beginner and a quick one for anyone else. What it teaches is accuracy: six arms at even angles, branches of matching length, and knots of the same size. Small slips show on a geometric shape, so it is good practice in placing the needle exactly where you mean to.
Stitched in a 4-inch (10 cm) hoop it makes a small winter decoration; worked on felt, the same outline becomes a tree ornament.
What You Need
- A 4-inch (10 cm) embroidery hoop
- Dusty blue, gray, or navy cotton, about 7 in (18 cm) square, or felt if you are making ornaments
- Six-strand cotton floss in white and pale blue
- An embroidery needle suited to 3 strands
- A way to mark dark fabric: a white marking pencil, light-colored transfer paper, or water-soluble stabilizer
- A ruler and small sharp scissors
Plan on a single evening for one snowflake. That is a rough guide, and repeats go faster.
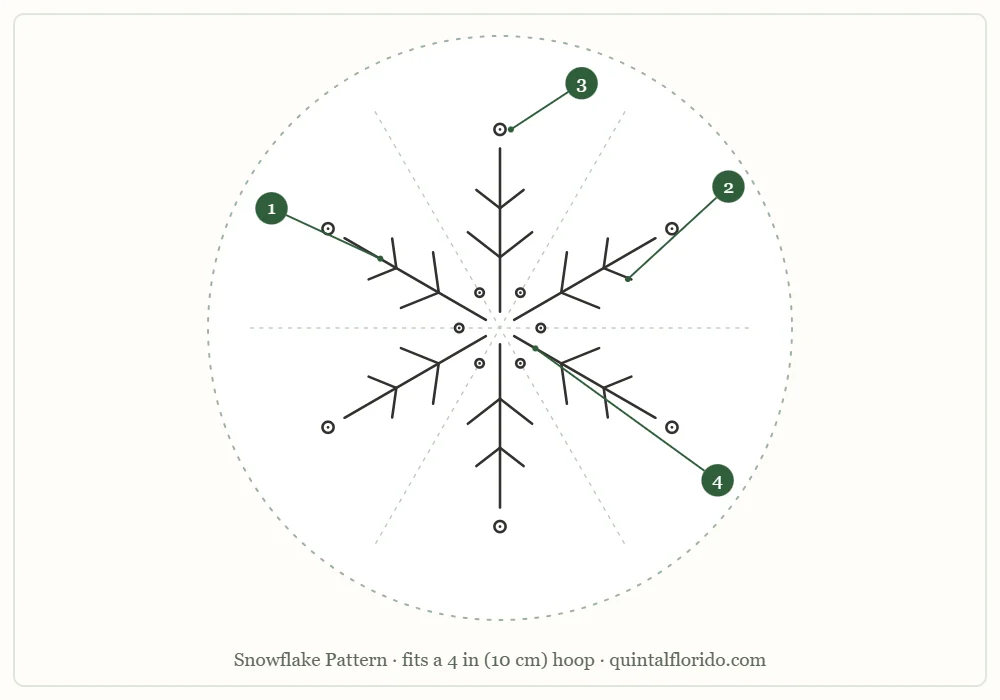
Print the outline or trace it from the screen, scaling it so the arm tips stop about 1/2 in (12 mm) short of the hoop edge.
Stitch and Color Key
| Part | Element | Stitch | Color | Strands |
|---|---|---|---|---|
| 1 | Six long arms | Backstitch | White | 3 |
| 2 | V branches on each arm | Fly stitch or two straight stitches | White | 2 |
| 3 | Arm tips | French knots | White | 3 |
| 4 | Ring of six dots around the center | French knots | Pale blue | 2 |
Transferring the Design
Dark fabric and felt are hard to trace through, so the window method rarely works here. Two approaches are more dependable. With light-colored transfer paper, lay the paper chalky side down on the fabric, place the outline on top, and go over the lines with a ruler and a ballpoint pen. With water-soluble stabilizer, draw or print the outline on the stabilizer, stick it to the fabric, stitch through it, and rinse it away at the end. Stabilizer is the better choice for felt. Both methods are explained in the guide to transferring embroidery patterns.
The 60-degree guide lines on the outline are there to help you check the angles. Transfer the six arms with a ruler first, make sure the angles between them look equal, and only then mark the branches and dots.
Stitching Order
- Part 1, the six arms. With 3 strands of white, backstitch the arms as three straight lines that cross at the center, each running from one arm tip to the opposite tip. Keep the stitches an even 1/8 to 3/16 in (3 to 5 mm) and place a stitch end exactly at the center point on each line, so all three lines share that hole and the crossing stays flat.
- Part 2, the V branches. Change to 2 strands of white. Each arm carries two pairs of branches, and every V opens toward the arm tip. To work one as a fly stitch, come up at A, the tip of the left branch, and go down at B, the tip of the right branch, leaving a loose loop. Come up at C on the arm line, at the point of the V, with the loop under the needle, and pull until the thread forms a V. Go down just on the other side of the loop with a tiny stitch to hold it. If you prefer, make two straight stitches instead: from A down into C, then from B down into C.
- Part 3, the arm tips. Return to 3 strands of white and make a French knot at the end of each arm. Come up at the tip, wrap the thread twice around the needle, and go down right next to the hole you came up from, not into it. Hold the working thread taut until the knot is seated.
- Part 4, the center ring. With 2 strands of pale blue, make six French knots in a ring around the center, one in each gap between two arms. They are smaller than the white knots because of the lower strand count, which is intended.
Tip
Work all the inner Vs around the snowflake first, then all the outer ones. Repeating the same stitch six times in a row makes it much easier to keep the lengths matched than finishing one arm at a time.
Common Problems and Fixes
The arms look uneven
The cause is almost always the transfer, not the stitching. Check the marked lines against the guide lines before threading a needle. If an arm has already been stitched off-angle, unpick that one line; backstitch comes out easily when you snip every third stitch from the back.
The Vs are lopsided
Points A and B should be the same distance from the arm and level with each other. If your fly stitches drift, switch to two straight stitches, which let you place each branch separately.
Dark fabric shows through the white
White floss can look thin on navy. Make sure the 3 strands lie side by side instead of twisted, and let the needle hang now and then so the thread untwists.
White thread looks gray
White picks up dust and marks from hands and from transfer paper. Wash your hands before stitching and store the hoop in a clean bag between sessions.
Watch out
On dark fabric, white thread carried across the back is hidden, but dark lint is not. Trim tails neatly, because stray fibers trapped under white stitches are hard to remove afterward.
Variations
- Colors. Reverse the scheme with pale blue arms and white knots, or stitch everything in white on gray for a quieter piece.
- A flurry. Scale the outline to three sizes and scatter them across a larger hoop. On the smallest, give each arm one pair of branches instead of two.
- Ornaments. Stitch the snowflake on a circle of felt, cut a second circle the same size, and join the two with blanket stitch around the edge, slipping a ribbon loop between the layers at the top.
- Other uses. A 1.5-inch (4 cm) version suits gift tags, stocking cuffs, and napkin corners, and sits well alongside the moon and stars pattern in a winter set.
If any of the stitches are unfamiliar, the guide to basic embroidery stitches shows backstitch and the French knot step by step, and the fern pattern includes a diagram of the fly stitch.
Finishing
Remove any transfer marks or stabilizer as the method requires, let the piece dry, and press it face down on a folded towel so the knots are not flattened. For a hoop display, trim and gather the fabric behind the rings as described in the guide to finishing an embroidery hoop. A felt backing in white or pale blue suits this design well.
Frequently asked questions
How do I transfer a pattern onto dark fabric?
Tracing against a window rarely works on dark cloth. Use light-colored transfer paper, or draw the design on water-soluble stabilizer, stick it on, stitch through it, and rinse it away.
Can I use straight stitches instead of fly stitch for the branches?
Yes. Two straight stitches meeting at the point of the V on the arm give the same look and let you place each branch separately.
How many strands should I use for the snowflake?
Use 3 strands of white for the arms and the knots at the arm tips, 2 strands of white for the V branches, and 2 strands of pale blue for the ring of knots around the center.
Can I stitch this snowflake on felt?
Yes. Felt works well for ornaments. Transfer the design with water-soluble stabilizer, then join the stitched circle to a second felt circle with blanket stitch.