Fern Embroidery Pattern with Fly Stitch Fronds
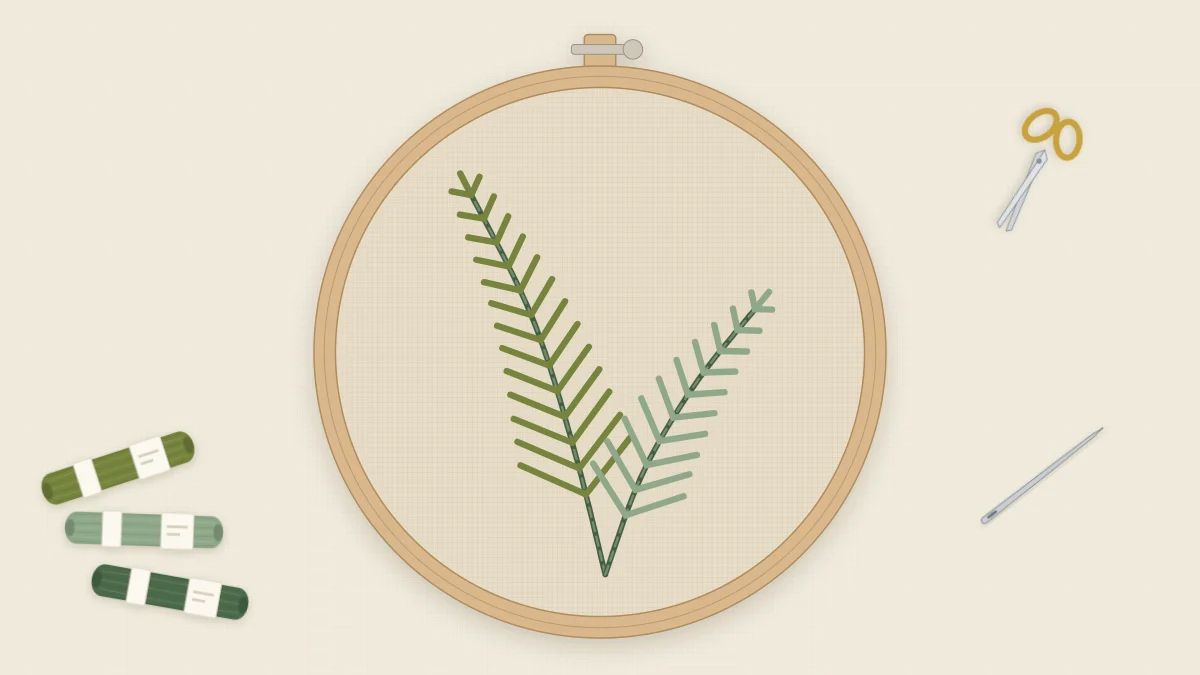
Two arching fern fronds for a 5-inch hoop, stitched with a stem stitch rib and fly stitch leaflets in three greens. Includes a step-by-step fly stitch lesson.
Tutorial at a glance
Materials
- 5-inch (13 cm) embroidery hoop
- Natural linen or white cotton, about 8 in (20 cm) square
- Six-strand cotton floss in deep green, moss green and sage green
- Embroidery needle
- Water-soluble pen or sharp pencil
- Small sharp scissors
Fly stitch could have been invented for ferns. One stitch makes a V, the two arms of the V are a pair of leaflets, and a column of them makes a frond. Once the movement is familiar, a whole frond takes only a few minutes, which makes this one of the quickest patterns to finish in a 5-inch hoop.
The design has two fronds rising from a shared base and arching away from each other, the left one taller than the right. Each has a curved central rib and pairs of leaflets that shorten toward the tip. It is an easy pattern, suited to anyone who can already work a line of stem stitch and wants to add one new stitch.
What You Need
- A 5-inch (13 cm) embroidery hoop
- Natural linen or white cotton, cut to about 8 in (20 cm) square
- Six-strand cotton floss in deep green, moss green and sage green
- An embroidery needle with an eye large enough for three strands
- A water-soluble pen or a sharp pencil
- Small sharp scissors
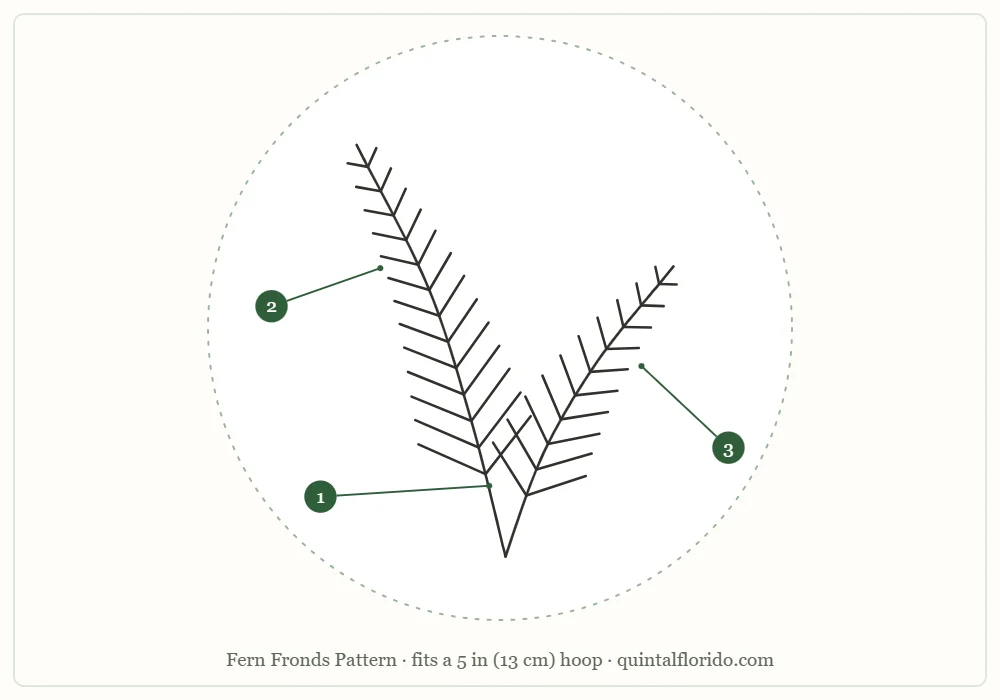
The outline can be printed or traced from the screen. Scale it so the taller frond stops about 1/2 in (12 mm) short of the hoop edge.
Stitch and Color Key
| Part | Element | Stitch | Color | Strands |
|---|---|---|---|---|
| 1 | Central rib of each frond | Stem stitch | Deep green | 2 |
| 2 | Leaflet pairs of the taller frond | Fly stitch (each V makes one pair) | Moss green | 3 |
| 3 | Leaflet pairs of the shorter frond | Fly stitch | Sage green | 3 |
Stem stitch is covered in the guide to basic embroidery stitches. Fly stitch is explained in full below.
Transferring the Design
Trace the two ribs as lines, and mark the leaflets as short strokes on each side of the rib. You do not need to draw them precisely; the tip of each stroke shows where the needle goes, and that is all the stitch needs. Any light-fabric method from the guide on how to transfer embroidery patterns will do, and tracing against a window is the simplest.
How to Work Fly Stitch
A fly stitch is a V of thread held in place by a small anchoring stitch at its point. Practice a few on the margin of your fabric before starting the fronds.
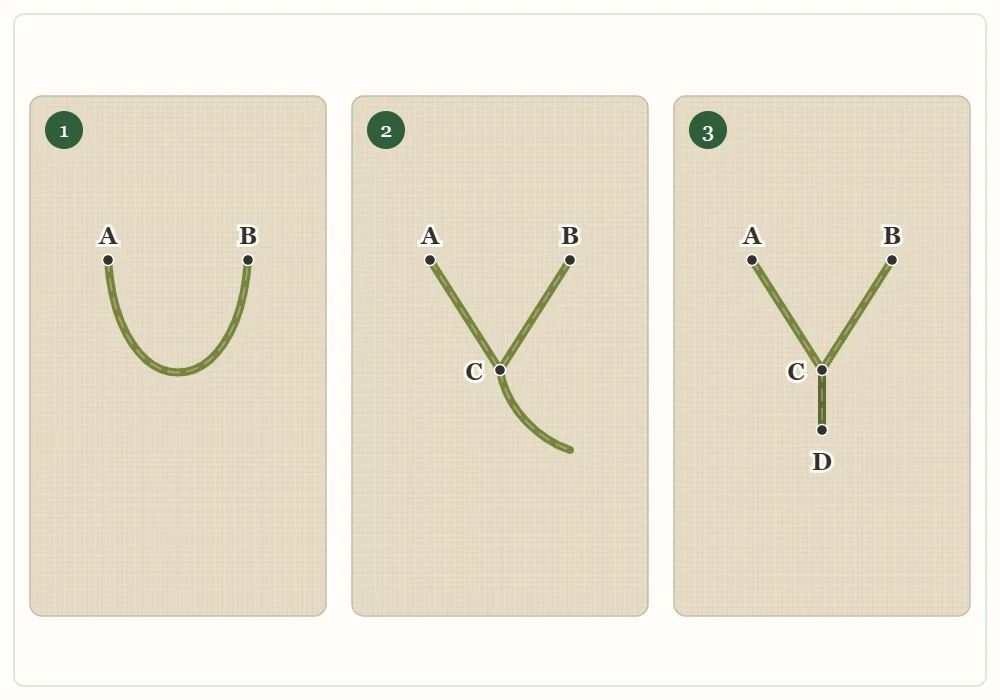
- Come up at A, the tip of the left leaflet.
- Go down at B, the tip of the right leaflet, level with A. Do not pull the thread tight. Leave a loose loop on the surface.
- Come up at C, on the rib below and midway between A and B, with the needle inside the loop.
- Pull gently until the loop tightens into a V with its point at C.
- Go down at D, just below C on the rib line, making a small stitch over the thread. This anchoring stitch holds the V in place.
Worked one below the other, fly stitches build their own rib out of the anchoring stitches, as the diagram shows. In this pattern they sit on top of the stem stitch rib, which gives each frond a darker, more defined spine.
Stitching Order
- Part 1, the two ribs. Thread two strands of deep green. Work each rib in stem stitch from the shared base up to the tip, with stitches about 1/8 in (3 mm) long. Keep the working thread on the outside of the curve for the whole line so the twist stays even.
- Part 2, the tip of the taller frond. Thread three strands of moss green. Begin at the top with a single straight stitch that continues the line of the rib. This is the tip stitch.
- Part 2, the leaflet pairs. Work fly stitches down the frond, starting directly under the tip stitch. Make the first V narrow, and widen each one a little as you move toward the base, following your traced strokes. Place every C and D on the rib.
- Part 3, the shorter frond. Change to three strands of sage green and repeat: a tip stitch first, then fly stitches from the tip down to the base.
- The shared base. Stop the leaflets about 1/2 in (12 mm) above the point where the ribs meet, leaving a short bare stalk on each frond.
Tip
On a curved rib, the leaflets on the outside of the bend have more room than those on the inside. Make the outer arm of each V slightly longer than the inner arm, and the frond will look as if it is arching naturally.
Common Problems and Fixes
The V turns into a U
The loop was left too slack, or C is too close to the line between A and B. Bring the needle up lower on the rib and pull until the two arms are straight.
The fabric puckers along the rib
The opposite problem: the V is pulled too tight. The arms should lie flat on the fabric without dragging it inward. Check that the fabric is taut in the hoop, too.
The leaflets look uneven from side to side
A and B are not level. Use the traced strokes, and glance at the pair above before placing each new stitch.
The needle came up outside the loop
Then nothing catches the thread and it pulls into a straight stitch. Take the needle back out through C and bring it up again with the loop held to one side by your thumb.
Watch out
Keep the anchoring stitch short. A long stitch at D creates a gap before the next pair of leaflets and makes the frond look sparse. Each new V should start close under the one before it.
Variations
- Autumn fronds. Swap the greens for rust and mustard on natural linen. The guide to embroidery color planning has more on choosing shades that sit well together.
- A single frond. One frond on its own fits a bookmark, a napkin corner or the edge of a pillowcase.
- A fuller fern. Add a third, shorter frond between the two, stitched in two strands so it appears to sit behind them.
- A botanical pair. Fern fronds have the same upright, airy shape as the stems in the lavender embroidery pattern, and the two look good hung side by side.
- Larger scale. For a bigger hoop, lengthen the fronds by adding more leaflet pairs instead of stretching the stitches. Very long fly stitch arms tend to snag.
Finishing
Remove the transfer marks with cool water, let the fabric dry and press it face down on a folded towel. Center the two fronds in the hoop with the shared base a little below the middle, tighten the screw, and close the back using the steps in how to finish an embroidery hoop. Plan on one to two hours for the whole piece, including a few practice stitches.
Frequently asked questions
How do you work a fly stitch?
Come up at A, go down at B level with it and leave a loose loop. Come up at C, below and between them and inside the loop, pull the loop into a V, then make a small anchoring stitch down at D to hold it.
Do I stitch the rib or the leaflets first?
Stitch the stem stitch rib first. The fly stitch leaflets are then worked from the tip of the frond down to the base, with each anchoring stitch sitting on the rib.
Why does my fly stitch look like a U instead of a V?
The loop is too slack or the needle came up too close to the top of the stitch. Bring the needle up lower on the rib and pull until both arms are straight.
How many strands should I use for the fern?
Use 2 strands of deep green for the ribs and 3 strands of moss or sage green for the leaflets, so the leaflets look fuller than the rib.