8 Basic Embroidery Stitches Every Beginner Should Learn
Running stitch, backstitch, split stitch, stem stitch, chain stitch, lazy daisy, satin stitch, and French knot, each explained by needle positions with its most common mistake.
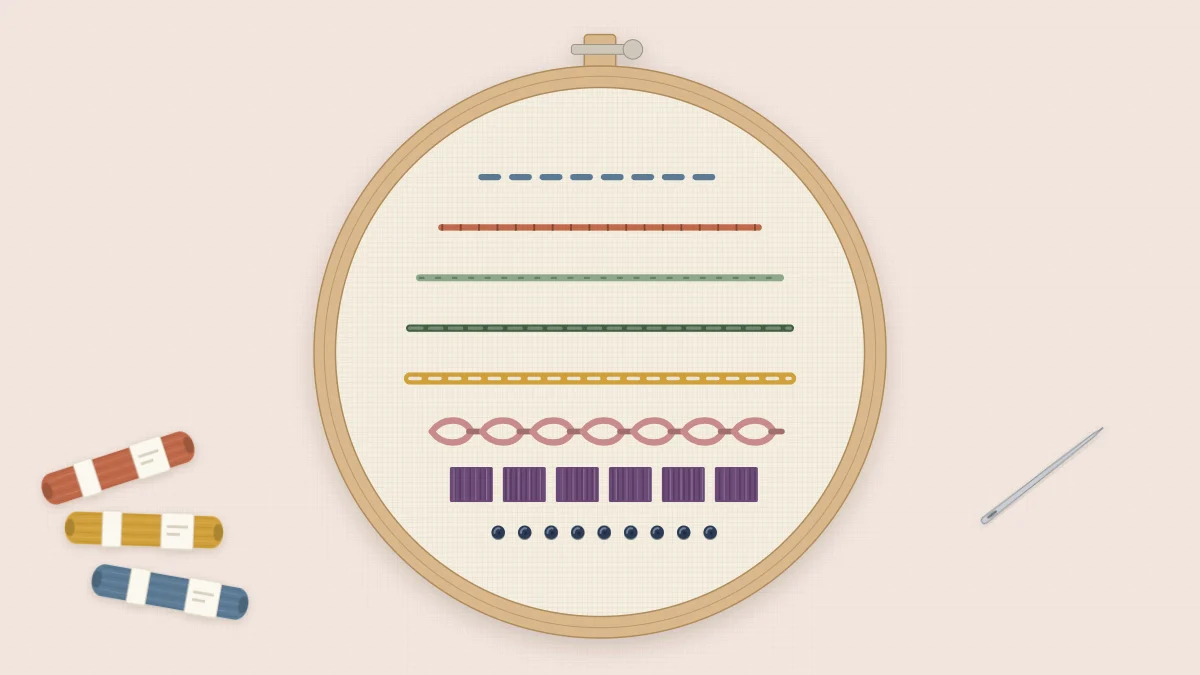
Eight stitches cover nearly everything in a beginner pattern: four that draw lines, two that make loops, one that fills shapes, and one that makes dots. Each is described below by needle positions, so “up at A” means bringing the needle from the back of the fabric to the front, and “down at B” means taking it from front to back. Practice them with three strands of floss on a scrap of plain cotton.
The Four Line Stitches
1. Running stitch
Good for: dashed lines, borders, and light open fills.
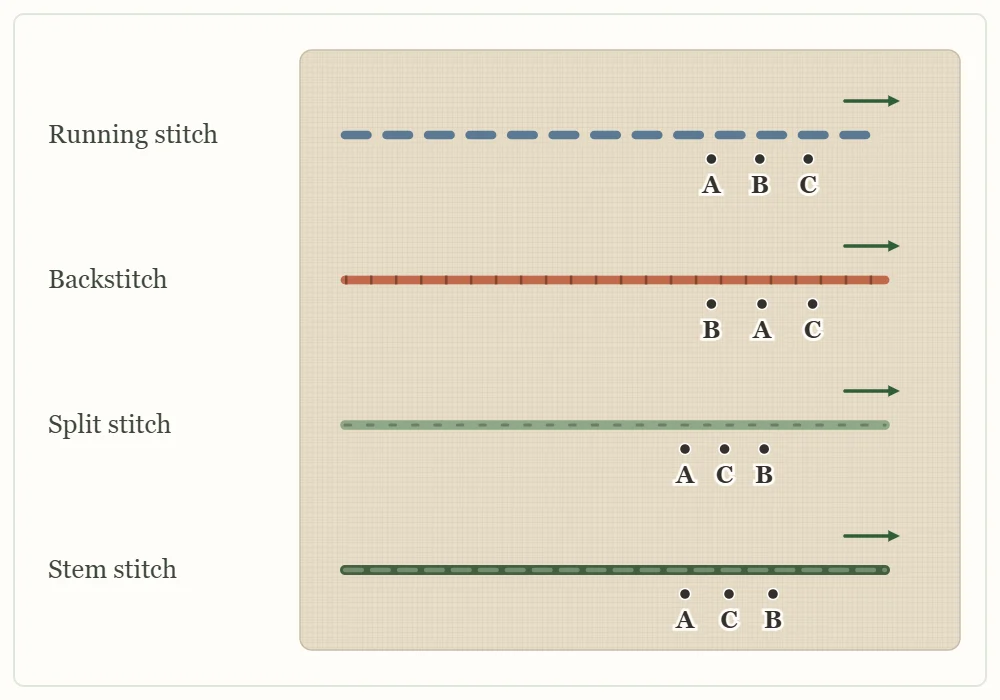
Come up at A, go down at B, leave a gap, and come up at C. Repeat along the line. The stitches on top and the gaps between them should be the same length.
Common mistake: uneven spacing. Slow down and match each new stitch to the one before it rather than to the drawn line.
2. Backstitch
Good for: solid outlines, lettering, and anything that needs a clean, unbroken line.
Come up at A, one stitch length ahead of the start of the line. Go down at B, back at the start. Come up at C, one stitch length beyond A, and go back down into the hole at A. Each stitch travels backward to meet the previous one.
Common mistake: leaving small gaps between stitches. Take the needle down into the very same hole where the last stitch ended.
3. Split stitch
Good for: slightly textured outlines, smooth curves, and edging a shape before filling it.
Make one straight stitch from A to B. Come up at C, in the middle of that stitch, piercing the thread so the strands divide around the needle. Go down one stitch length ahead and repeat, always coming up through the center of the previous stitch. The result looks like a fine braid.
Common mistake: coming up beside the thread instead of through it. An even number of strands makes splitting easier, because the needle can pass between two equal halves.
4. Stem stitch
Good for: stems, vines, and flowing curves. It looks like a thin twisted rope.
Come up at A and go down at B, but do not pull tight yet. Hold the loop of working thread below the line, come up at C, halfway between A and B and right beside the stitch, then pull through. For every stitch after that, go down one stitch length ahead and come up at the end of the previous stitch.
Common mistake: letting the working thread switch sides. Keep it on the same side of the needle for the whole line, either always below or always above. If it changes, the rope twist breaks and the line looks bumpy.
The Two Loop Stitches
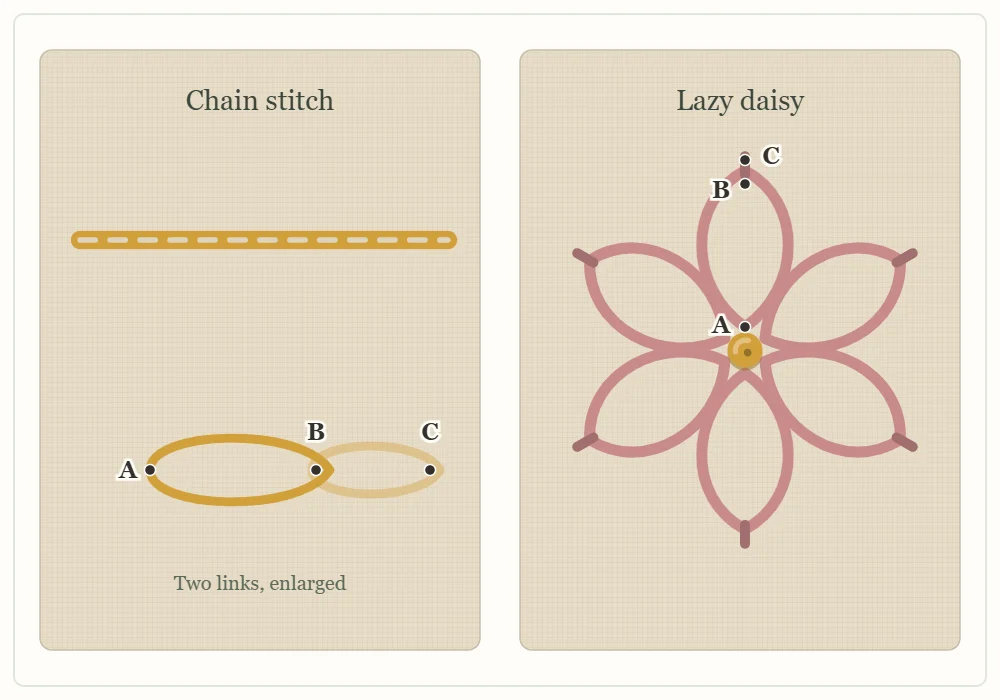
5. Chain stitch
Good for: bold outlines and thick lines. Rows of it worked side by side also make a fill.
Come up at A. Go back down at A, in the same hole or a thread away, and leave a loop on the surface. Come up at B, one stitch length ahead and inside the loop, then pull gently until the loop rests against the thread. To continue, go down at B inside the loop you just made and come up at C. End the row with a tiny stitch over the last loop to hold it.
Common mistake: pulling the loops tight. They turn into thin slits and the fabric puckers. Stop pulling as soon as the loop lies flat and rounded.
6. Lazy daisy (detached chain)
Good for: petals, small leaves, and buds.
It is a single chain stitch, anchored. Come up at A, the base of the petal. Go down at A again, leaving a loop. Come up at B, the petal tip, inside the loop. Pull gently, then go down at C, just outside the loop, making a tiny stitch that pins the tip in place.
Common mistake: a long, loose loop that flops sideways. Keep the loop snug enough to lie flat but still open, and make the anchor stitch very short.
One Fill and One Dot
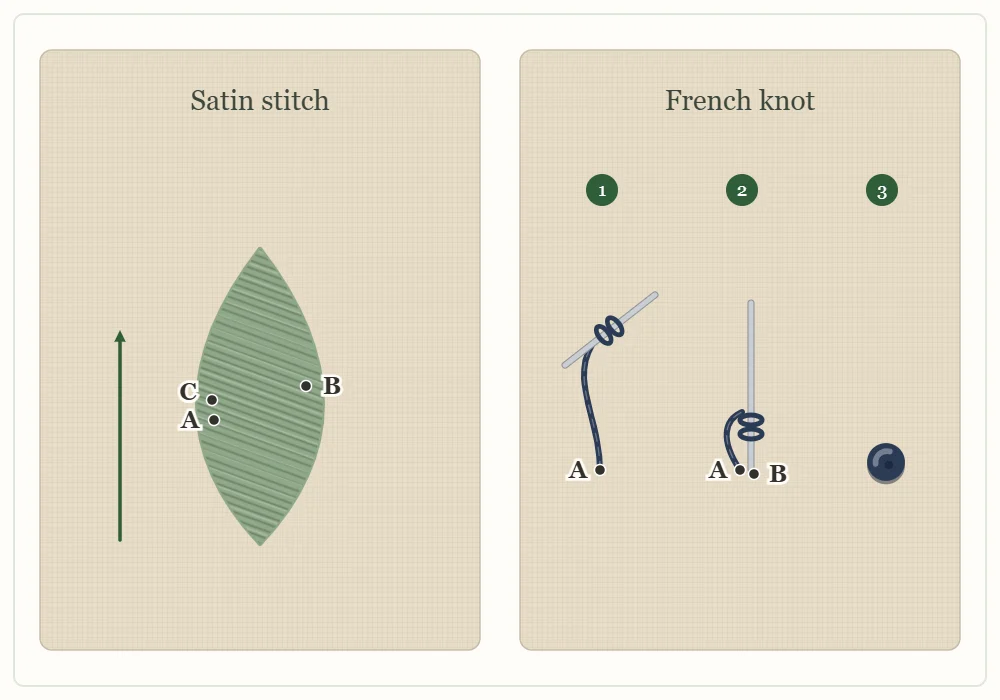
7. Satin stitch
Good for: filling small shapes such as leaves, petals, and dots with a smooth, solid surface.
Start in the middle of the shape. Come up at A on one edge, go down at B on the opposite edge, and come up at C, right beside A on the first edge. Lay each stitch snugly against the last, all parallel. Fill one half of the shape, then return to the middle and fill the other half.
Common mistake: ragged edges and gaps. Work exactly on the drawn line, and keep stitches shorter than about 1/2 in (12 mm). Longer ones loosen and snag, so divide a wide shape into sections.
Tip
For a crisper edge, outline the shape in split stitch first, then work the satin stitch over it, bringing the needle up and down just outside the outline.
8. French knot
Good for: flower centers, berries, eyes, and scattered dots.
- Come up at A and hold the thread taut with your other hand, a few inches from the fabric.
- Wrap the thread around the needle twice.
- Still holding the thread taut, insert the needle right next to A, a thread or two away, but not into the same hole.
- Slide the wraps down the needle until they sit on the fabric, then push the needle through to the back. Let go of the thread only at the last moment.
Common mistake: going back down the hole you came up from, which pulls the whole knot through to the back. The second most common is loosening the thread too early, which leaves a loopy knot.
Watch out
For a bigger knot, add strands rather than wraps. More than two wraps tends to give a lopsided knot that tips over.
Quick Reference
| Stitch | Job | Looks like | Remember |
|---|---|---|---|
| Running stitch | Line | Dashes | Stitches and gaps equal |
| Backstitch | Line | Solid line | Reuse the previous hole |
| Split stitch | Line | Fine braid | Pierce the thread |
| Stem stitch | Line | Twisted rope | Thread stays on one side |
| Chain stitch | Line | Linked loops | Do not pull tight |
| Lazy daisy | Petals and leaves | Single loop | Short anchor stitch |
| Satin stitch | Fill | Smooth solid area | Parallel, side by side |
| French knot | Dot | Small raised bead | Down next to the hole, not in it |
Patterns That Practice Each Stitch
A stitch sticks once you have used it in a real design. These patterns on the site were drawn with that in mind:
- Backstitch, lazy daisy, and French knots all appear in the easy leaf sprig, which is the best first hoop.
- Chain stitch, stem stitch, backstitch, split stitch, and running stitch each get one arch of the modern rainbow, so it doubles as a line-stitch sampler.
- Stem stitch and lazy daisy get plenty of repetition in the three-daisy pattern, with thirty petals to work.
- Satin stitch comes in small, manageable stripes on the tiny bee.
Once the eight feel familiar, the next skill is deciding which one suits which part of a design. The guide on choosing stitches for a pattern picks up from here.
Frequently asked questions
Which embroidery stitch should I learn first?
Start with running stitch and backstitch. They teach even spacing and tension, and backstitch alone can outline almost any simple design.
Why does my French knot pull through to the back?
The needle is going back down the same hole it came up from. Insert it right next to that hole, a thread or two away, and keep the thread taut until the knot is formed.
What is the difference between stem stitch and split stitch?
In stem stitch the needle comes up beside the previous stitch with the working thread kept on one side, giving a twisted rope. In split stitch the needle comes up through the previous stitch, giving a fine braid.
How long should satin stitches be?
Keep them shorter than about 1/2 in (12 mm). Longer stitches loosen and snag, so divide a wide shape into sections.