Autumn Pumpkin Embroidery Pattern with a Curling Vine
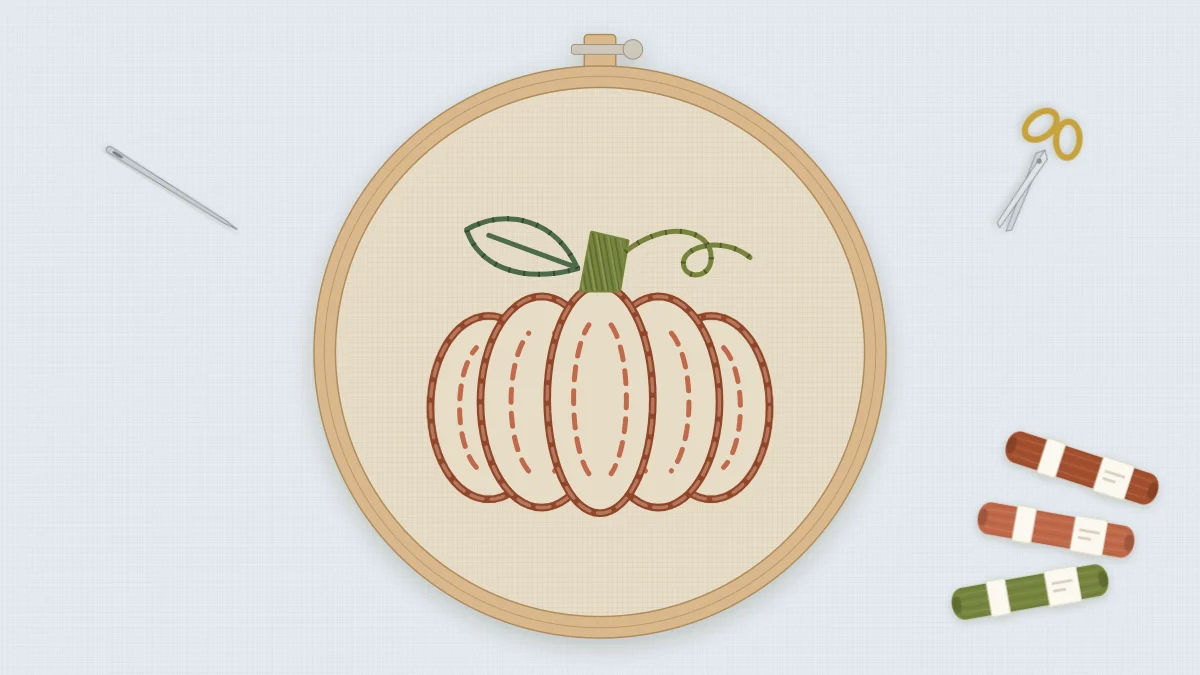
An original pumpkin design for a 5-inch hoop with stem stitch outlines, an open running stitch fill, and a green stalk, tendril, and leaf. Easy and relaxing to stitch.
Tutorial at a glance
Materials
- 5-inch (13 cm) embroidery hoop
- Natural linen or cream cotton, about 8 in (20 cm) square
- Six-strand cotton floss in rust, terracotta, moss green, and deep green
- Embroidery needle
- Water-soluble pen or sharp pencil
- Small sharp scissors
Curves are what make a pumpkin look round, and curves are what this pattern practices. Five bowed segments in stem stitch give you plenty of repetition on a gentle arc, and the rows of running stitch inside them teach you to follow a shape with a line instead of filling it solid. The result has an open, sketchy texture that suits linen and uses far less thread than a satin-stitched pumpkin would.
It is an easy pattern. If you can work a running stitch and are ready to try stem stitch, you have what you need. A quick look at the guide to basic embroidery stitches will cover anything unfamiliar.
What You Need
- A 5-inch (13 cm) embroidery hoop
- Natural linen or cream cotton, about 8 in (20 cm) square
- Six-strand cotton floss in rust, terracotta, moss green, and deep green
- An embroidery needle suited to 3 strands
- A water-soluble pen or sharp pencil
- Small sharp scissors
Allow an evening or two. The running stitch rows take longer than they look, but they are relaxing work.
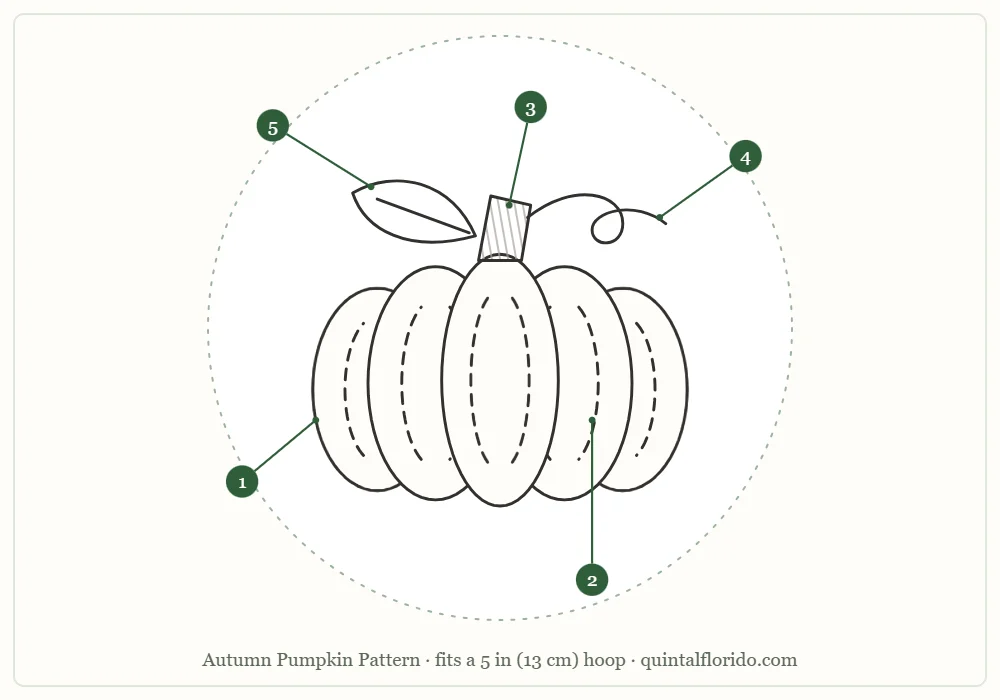
The outline can be printed or traced from the screen. Scale it so the pumpkin is about 3 in (8 cm) wide, which leaves room in the hoop for the tendril and leaf.
Stitch and Color Key
| Part | Element | Stitch | Color | Strands |
|---|---|---|---|---|
| 1 | Pumpkin segment outlines | Stem stitch | Rust | 3 |
| 2 | Open fill inside the segments | Rows of running stitch following the curves | Terracotta | 2 |
| 3 | Stalk | Satin stitch | Moss green | 3 |
| 4 | Curling tendril | Backstitch | Moss green | 2 |
| 5 | Leaf | Backstitch outline with a straight-stitch center vein | Deep green | 2 |
Transferring the Design
Both linen and cream cotton are light enough to trace through against a window or a lit screen. Keep the base of the pumpkin level with the weave of the fabric so it does not appear to roll to one side. Transfer only the outlines, the stalk, the tendril, and the leaf. The running stitch rows of part 2 do not need to be drawn in full; one light guide line down the middle of each segment is enough. Other options for heavier linen are in the guide to transferring embroidery patterns.
Stitching Order
- Part 1, the segment outlines. With 3 strands of rust, stem stitch the center segment first, then the two beside it, then the two outer ones. Come up at A, go down at B, and come up at C, halfway back between A and B, with the working thread held below the needle. Keep the thread on that same side for every stitch along a line; if it flips to the other side, the twist of the rope reverses and the line looks broken. Where neighboring segments share a line, stitch it once.
- Part 2, the open fill. Change to 2 strands of terracotta. Inside each segment, work rows of running stitch that follow the curve of its outline, from top to bottom. Two rows fit the narrow outer segments and three fit the wider ones. Leave a clear gap between each row and the rust outline, and offset the stitches from row to row like bricks so the dashes do not line up in stripes.
- Part 3, the stalk. With 3 strands of moss green, fill the stubby stalk with satin stitch. Lay the stitches across the stalk on a slight slant, starting in the middle and working out to each end. The stalk is short, so every stitch stays a manageable length.
- Part 4, the tendril. With 2 strands of moss green, backstitch the tendril to the right of the stalk. Start where it leaves the stalk and shorten the stitches to about 1/16 in (2 mm) as the curl tightens.
- Part 5, the leaf. With 2 strands of deep green, backstitch the leaf outline to the left of the stalk, then add the center vein as one straight stitch from the base of the leaf toward the tip, stopping a little short of it.
Tip
On the curved outlines, hold the working thread on the outside of the curve. Stem stitch hugs a bend more smoothly that way, and it keeps the thread on the same side from the first stitch to the last.
Common Problems and Fixes
The stem stitch looks like a row of separate dashes
The needle is coming up too far back, or the thread has switched sides. Come up halfway back along the previous stitch, right beside it, and check the thread position before each pull.
The curves turn angular
The stitches are too long for the bend. Shorten them at the top and bottom of each segment, where the curve is tightest, and lengthen them again along the sides.
The running stitch rows look messy
Uneven stitch length is the usual reason. Pick a length, about 3/16 in (5 mm), with gaps a little shorter than the stitches, and keep to it. If a row wanders, pull out that row alone; running stitch is the easiest stitch to remove.
The linen puckers inside the segments
Running stitch gathers fabric when pulled, which is exactly what it is used for in sewing. Keep the fabric taut in the hoop and smooth each row flat with a fingertip before you start the next.
Watch out
Rust and terracotta are close in tone. Sort the two colors under daylight before you start and label them, or you may discover halfway through that an outline and its fill were stitched in the same shade.
Variations
- Colors. For a pale pumpkin, outline in soft gray and fill with cream on a darker linen. For a deeper autumn palette, replace terracotta with mustard. The guide to embroidery color planning can help you test a combination before you commit.
- Denser fill. Add more rows of running stitch, or switch part 2 to rows of backstitch, for a more solid pumpkin.
- A patch of three. Scale the outline to two or three sizes and overlap them slightly in a 6-inch (15 cm) hoop, giving only the front one a tendril.
- Other uses. At about 2 in (5 cm) wide, without the fill, the outline works on a tea towel, a tote, or the corner of a table runner.
Finishing
Rinse away the transfer marks in cool water, let the piece dry, and press it face down on a folded towel. Linen creases easily, so press while it is still slightly damp. Then center the pumpkin in the hoop and close the back following the guide to finishing an embroidery hoop. A rust or moss green felt backing ties in well with the thread colors.
Frequently asked questions
Is this pumpkin pattern good for beginners?
Yes. It is rated easy. The outlines are stem stitch, the fill is plain running stitch, and the only satin stitch is the small stalk.
How do I keep stem stitch smooth on the curved segments?
Keep the working thread on the same side of the needle for every stitch, ideally the outside of the curve, and shorten the stitches where the curve tightens.
Do I need to draw the running stitch rows on the fabric?
No. Transfer the outlines and, if you like, one light guide line down the middle of each segment. The rows simply follow the curve of the outline.
What colors of floss does the pumpkin use?
Rust for the outlines, terracotta for the fill, moss green for the stalk and tendril, and deep green for the leaf.