Moon and Stars Embroidery Pattern on Dark Fabric
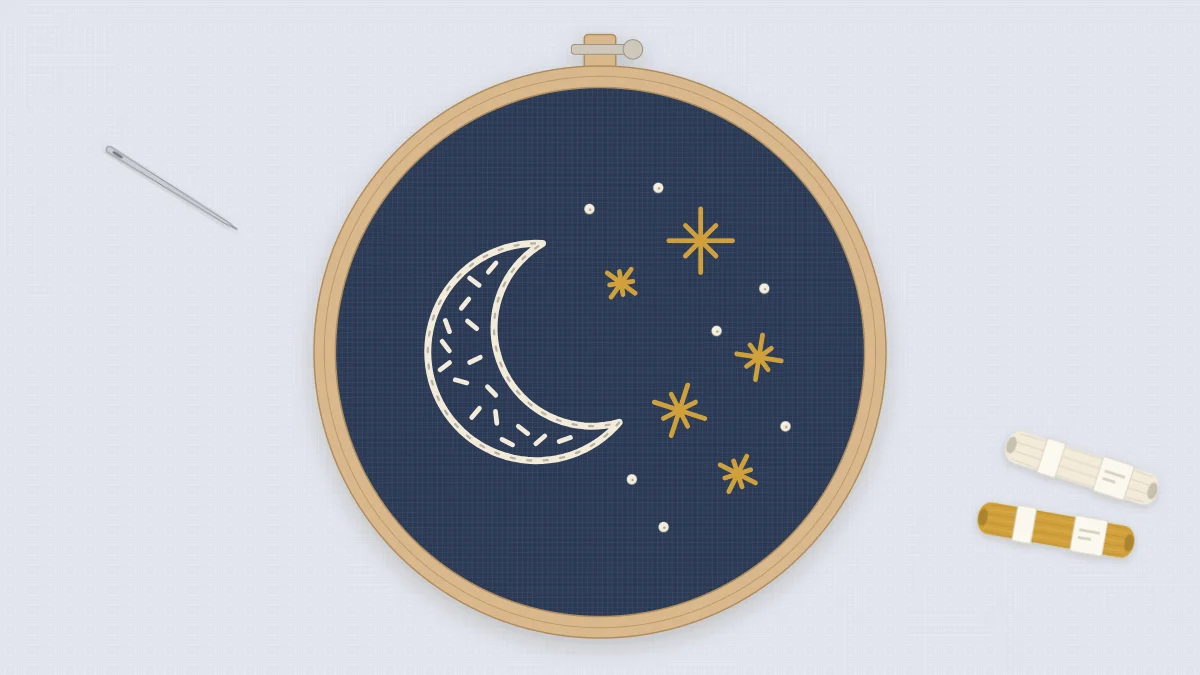
A crescent moon, five stars and a scatter of French knots in cream and mustard on navy cotton, with clear advice on transferring a pattern to dark fabric.
Tutorial at a glance
Materials
- 3-inch (7.5 cm) embroidery hoop
- Navy or black cotton, about 6 in (15 cm) square
- Six-strand cotton floss in cream and mustard
- Embroidery needle with a sharp point
- White transfer paper, white chalk pencil or water-soluble stabilizer
- Small sharp scissors
Pale thread on dark fabric does half the design work for you. A cream crescent and a few mustard stars need very little stitching to stand out against navy or black cotton, which makes this a quick, satisfying pattern for a 3-inch hoop. The stitches are all beginner level. The only new skill is getting the design onto fabric you cannot see through, and that is covered in detail below.
The design has a crescent moon on the left, five small stars of different sizes scattered to the right, and a sprinkle of dots between them. It suits a first or second project, and it is a comfortable way to practice French knots, since a knot that lands slightly off its mark simply becomes another star.
What You Need
- A 3-inch (7.5 cm) embroidery hoop
- Navy or black cotton, cut to about 6 in (15 cm) square
- Six-strand cotton floss in cream and mustard
- An embroidery needle with a sharp point
- A way to mark dark fabric: white dressmaker’s transfer paper, a white chalk pencil, or water-soluble stabilizer
- Small sharp scissors
Pick a firm, plain-weave cotton. Dark fabrics can shed dye, so wash and press the piece before you begin; the embroidery fabric guide explains how to prepare fabric and what to look for in a weave.
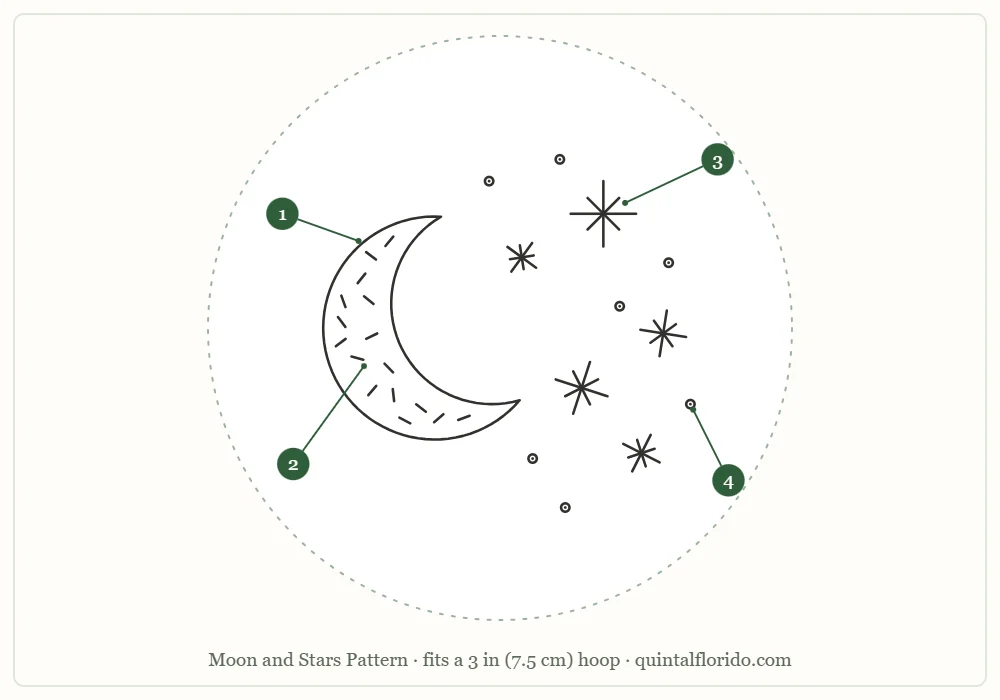
The outline can be printed or traced from the screen onto paper, and scaled so the whole design fits inside the hoop with a margin of about 1/4 in (6 mm) all around.
Stitch and Color Key
| Part | Element | Stitch | Color | Strands |
|---|---|---|---|---|
| 1 | Crescent moon outline | Split stitch | Cream | 3 |
| 2 | Moon fill | Seed stitch | Cream | 2 |
| 3 | Five stars | Straight stitches crossing at the center (star stitch) | Mustard | 2 |
| 4 | Dots of distant stars | French knots | Cream | 2 |
Split stitch and French knots are both shown with needle positions in the guide to basic embroidery stitches.
Transferring the Design to Dark Fabric
Tracing over a window does not work here, because light will not pass through navy or black cotton. Use one of these three methods instead.
- White transfer paper. Lay the fabric on a hard surface, place the transfer paper chalky side down on top, then the printed pattern. Go over every line firmly with a ballpoint pen or a stylus. The lines are faint and brush away with handling, so stitch the piece soon after.
- White chalk pencil. Cut the crescent out of paper, hold it on the fabric as a template and draw around it. Mark each star with a small cross and each knot with a dot. This is the quickest method for a design this simple.
- Water-soluble stabilizer. Trace the pattern onto the film, baste or stick it to the fabric, stitch through both layers and rinse the film away at the end. It gives the most accurate lines.
The full guide on how to transfer embroidery patterns compares these methods with the ones used for light fabric.
Watch out
Test your marking tool on a scrap of the same fabric before you use it on the real piece. Some white pencils and papers leave a pale ghost line on dark cotton that does not wash out completely.
Stitching Order
- Part 1, the crescent outline. Thread three strands of cream. Starting at one tip of the crescent, come up at A and go down at B, about 1/8 in (3 mm) along the line. Come up at C, halfway back along that stitch and through the middle of the thread, so the needle splits the strands. Continue around the whole crescent. At each sharp tip, end the line with a stitch into the point and begin again from that same point down the other edge.
- Part 2, the moon fill. Change to two strands of cream. Scatter tiny straight stitches inside the crescent, each about 1/8 in (3 mm) long and turned at a different angle from the ones around it. Space them evenly and let the dark fabric show between them. Use fewer, shorter stitches in the narrow tips.
- Part 3, the five stars. Thread two strands of mustard. For each star, make one vertical straight stitch, then a horizontal stitch across its center, then two diagonal stitches across the same center. All four stitches cross at one point, giving eight rays. On the smallest stars, the vertical and horizontal stitches alone are enough.
- Part 4, the distant stars. Thread two strands of cream. Come up at a dot, wrap the thread twice around the needle, and go down right next to the hole you came up from, not into it. Keep the wraps snug against the fabric as you pull through.
Tip
For a star with a longer vertical ray, like a twinkle, make the first stitch about twice the length of the others. Varying this from star to star keeps the sky from looking uniform.
Common Problems and Fixes
The crescent tips look blunt
Split stitch rounds off sharp points if you stitch straight around them. Finish the line exactly at the tip, then start the return edge from the same hole with a slightly shorter first stitch.
The star stitches do not meet in the middle
Mark the center with a dot before you start, and make sure each stitch passes directly over it. A small holding stitch across the center, worked last, pulls loose rays together.
Lint and fluff show on the fabric
Dark cotton picks up every pale fiber. Keep a piece of sticky tape nearby and dab the surface before you finish the hoop.
Thread shows through from the back
It rarely does on dark fabric, which makes this pattern forgiving. Still, end the thread after each star rather than carrying it a long way, so the back stays flat when the hoop is closed.
Variations
- Silver and white. Stitch the moon in white and the stars in pale gray on black cotton for a colder night sky.
- A solid moon. Replace the seed stitch with rows of split stitch that follow the curve of the crescent until it is filled.
- More sky. Move to a 5-inch (13 cm) hoop, keep the moon the same size and add extra stars and knots at random.
- A winter set. The snowflake embroidery pattern is also built from lines crossing at a center and French knots, and it is stitched in white on blue or navy cotton. The two make a matching pair.
- On a garment. A crescent and two or three stars fit neatly on a dark denim pocket or the corner of a pillowcase.
Finishing
Brush or rinse away any remaining chalk, or dissolve the stabilizer in lukewarm water, and let the fabric dry flat. Press from the back over a folded towel so the French knots are not crushed. Then tighten the piece in its hoop and close the back as described in how to finish an embroidery hoop. Plan on an evening for the whole project, including the transfer.
Frequently asked questions
How do I transfer an embroidery pattern onto dark fabric?
Tracing against a window does not work because light cannot pass through. Use white dressmaker's transfer paper, a white chalk pencil with a paper template, or water-soluble stabilizer that you stitch through and rinse away.
What is star stitch?
It is a group of straight stitches that all cross at the same center point. In this pattern a vertical, a horizontal and two diagonal stitches make a star with eight rays.
What thread colors show up best on navy fabric?
Light, warm colors such as cream, white, mustard and pale gray stand out clearly. Mid-tone blues and greens tend to sink into the background.
Do I need to wash dark fabric before stitching?
It is a sensible precaution, because dark cottons can release dye when the finished piece is rinsed. Wash, dry and press the fabric before transferring the design.