5 Simple Embroidery Border Patterns for Edges and Hems
Five original repeating borders built from one or two beginner stitches each, with spacing advice and a simple way to turn a corner.
Tutorial at a glance
Materials
- Napkins, tea towels, a pillowcase or a garment with cuffs, washed and pressed
- 5-inch (13 cm) or larger embroidery hoop
- Six-strand cotton floss in slate blue, mustard, terracotta, cream, dusty rose, sage green and deep green, as needed for the chosen border
- Embroidery needle with an eye for three strands
- Ruler and water-soluble pen
- Small sharp scissors
- Printed or traced pattern sheet
A border is one small repeat stitched over and over along a line, so the skill it asks for is consistency, not complexity. The five borders here each use one or two beginner stitches and can run along a napkin edge, a tea towel, a pillowcase hem or a shirt cuff.
What You Need
- The item to decorate: napkins, tea towels, a pillowcase or a garment with cuffs, washed and pressed
- A 5-inch (13 cm) or larger embroidery hoop, which you will move along the edge
- Six-strand cotton floss in the colors listed in the key for your chosen border
- An embroidery needle with an eye that takes three strands
- A ruler and a water-soluble pen
- Small sharp scissors
- The pattern sheet below
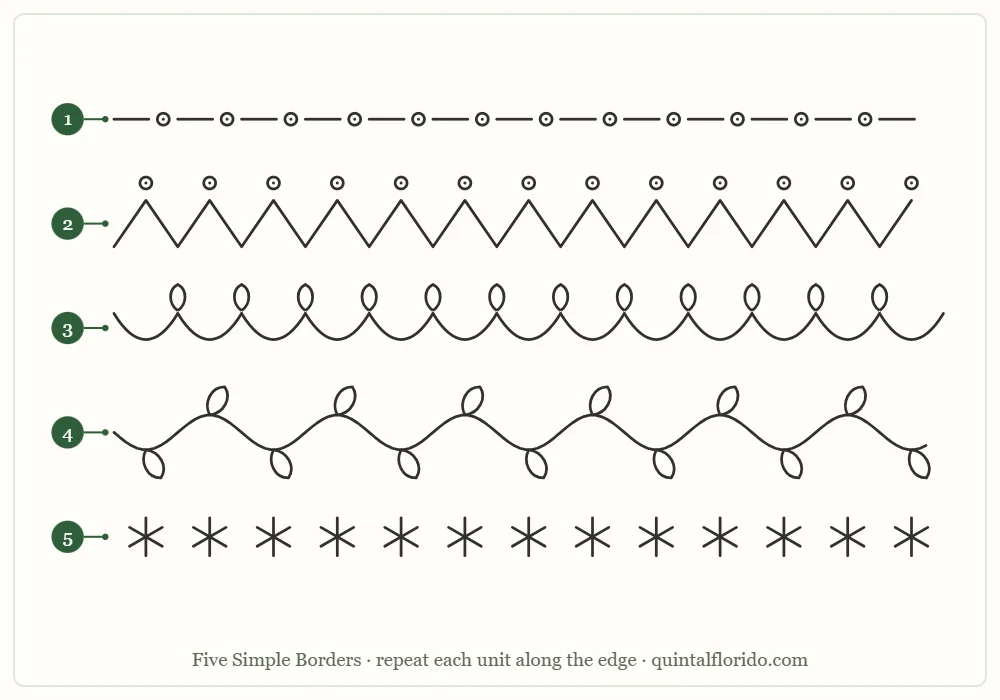
Print the sheet or trace a border from the screen. Each one can be scaled up or down to suit the item, and a short traced section is enough, because you repeat it along the edge.
Stitch and Color Key
| Part | Border | Stitch | Color | Strands |
|---|---|---|---|---|
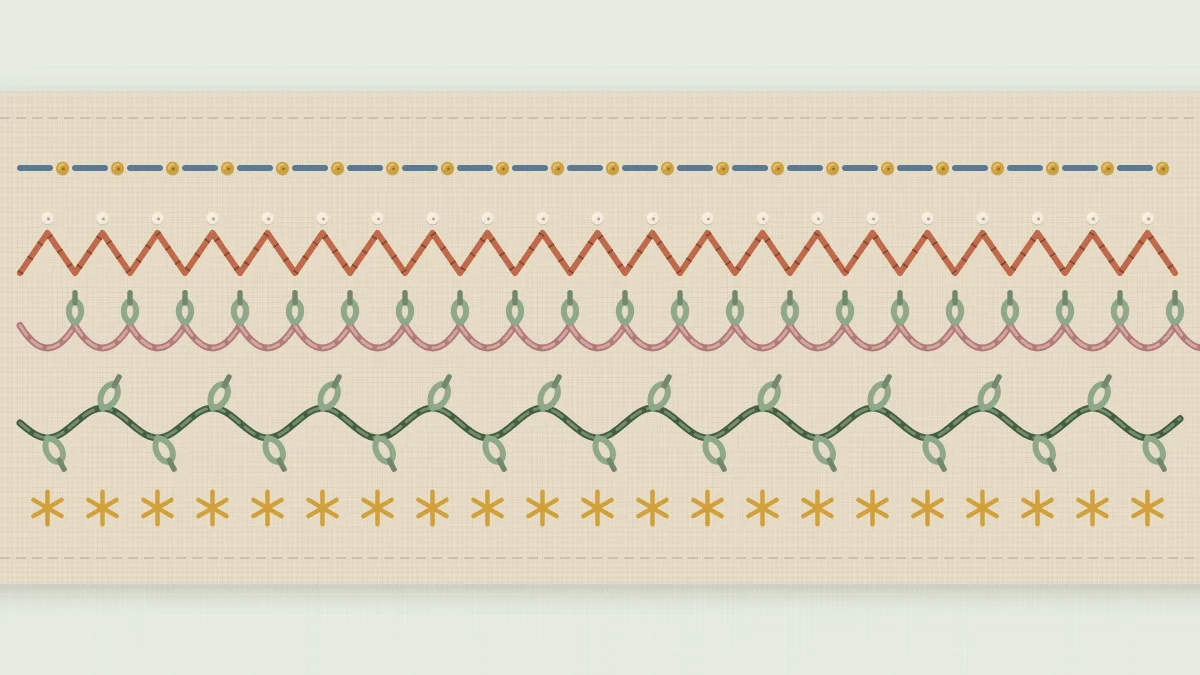
| 1 | Dash and dot | Running stitch and French knots | Slate blue dashes, mustard knots | 3 |
| 2 | Zigzag with dots at each upper peak | Backstitch and French knots | Terracotta zigzag, cream knots | 3 |
| 3 | Scallops with a petal where two arcs meet | Stem stitch and lazy daisy | Dusty rose arcs, sage green petals | 3 |
| 4 | Wavy vine with a leaf in each curve | Stem stitch and lazy daisy | Deep green vine, sage green leaves | 3 |
| 5 | Little six-point stars | Straight stitch | Mustard | 2 |
Every stitch in the table is explained in the guide to basic embroidery stitches.
Transferring a Border
A border looks neat when it runs parallel to the edge and the repeats are the same size, so measuring comes before tracing. Rule a light baseline with the water-soluble pen, about 3/4 to 1 in (2 to 2.5 cm) in from the edge or just above the hem stitching. Then mark the repeats as small ticks along it. A repeat of roughly 1/2 in (12 mm) suits borders 1, 2 and 5, and about 1 in (2.5 cm) suits the scallops and the vine. Start the ticks at the center of the edge and work outward, so both ends finish the same way. Trace the border over the ticks, or draw it freehand between them. For dark or thick fabric, see the other methods in how to transfer embroidery patterns.
Tip
Measure the full length of the edge and divide it by your repeat. If it does not come out whole, stretch or shrink every repeat by a hair instead of squeezing the last one. A difference that small cannot be seen.
Stitching Order
- Hoop the first section. Place the hoop at one end of the marked line with the fabric taut but not stretched. If the border sits too close to the edge for the hoop to grip, baste a strip of scrap fabric to the edge to extend it.
- Stitch the line first. Work the dashes, zigzag, arcs or vine across the whole hooped section before adding any accents. Even spacing is easier to judge on a plain line.
- Add the accents. Go back over the same section with the second color for the knots, petals or leaves.
- Move the hoop. Loosen the screw fully before shifting the hoop, so the rings do not crush finished knots. Overlap the stitched section slightly so the line continues without a break.
- Secure every thread. Weave the ends under the back of several stitches instead of knotting. Linens and clothing are washed, and woven ends lie flat and hold.
The Five Borders, One by One
Border 1: Dash and Dot
Work the dashes in running stitch with three strands of slate blue, each about 1/4 in (6 mm) long with a gap of the same length. Then place one mustard French knot in the middle of every gap. Wrap the thread twice and take the needle down right next to the hole it came up from, not into it.
Border 2: Zigzag with Dots
Backstitch the zigzag in three strands of terracotta. End a stitch exactly at each peak and valley and start the next from the same hole, which keeps the points sharp. Add a cream French knot at each upper peak.
Border 3: Scallops
Stitch each shallow arc in stem stitch with three strands of dusty rose, keeping the working thread on the same side of the needle for every stitch. Finish each arc at the point where it meets the next one and begin the new arc from that hole. Then work a single sage green lazy daisy petal at each meeting point.
Border 4: Wavy Vine
Work the vine as one continuous line of stem stitch in three strands of deep green. Keep the thread on the same side throughout, and shorten the stitches where the wave changes direction. Add one sage green lazy daisy leaf in each curve, alternating above and below the vine, with the base of each leaf touching the line.
Border 5: Little Stars
Each star is three straight stitches in two strands of mustard that cross at one center point, giving six points. Keep every stitch about 1/4 in (6 mm) long and let the third stitch lie over the first two without pulling it tight.
Turning a Corner
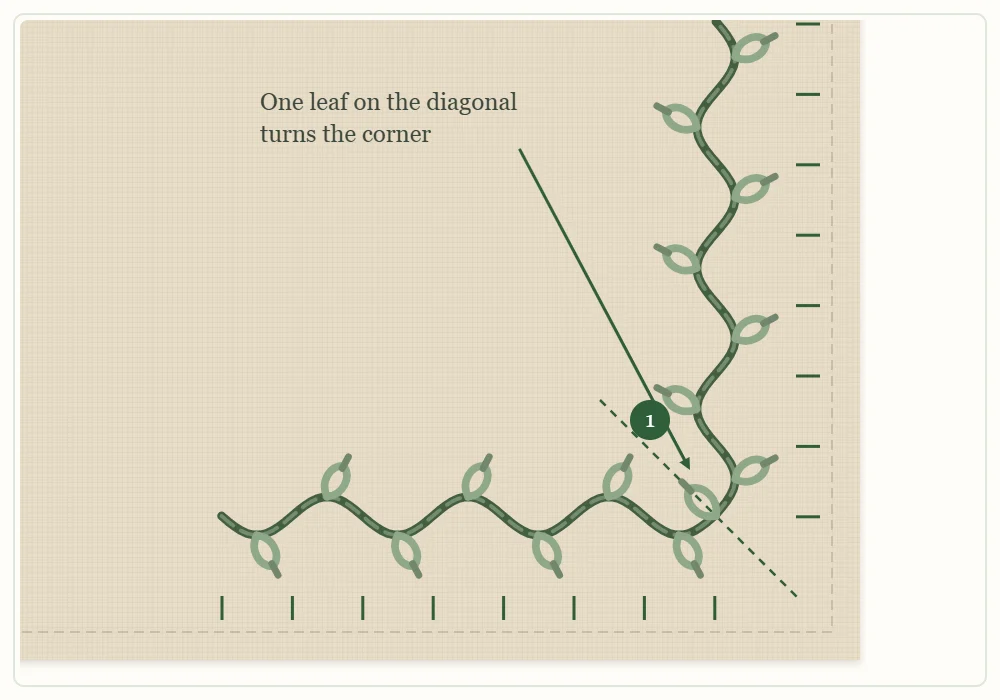
On napkins and other pieces where the border runs around a corner, plan the corner first. Rule both baselines so they cross, then mark the repeats outward from that crossing point along each edge, as the tick marks in the diagram show. Any adjustment then falls in the middle of a side, where it is least noticeable. For the vine, bring both lines into the corner and place a single leaf on the diagonal. The same idea works for the other borders: a knot, a petal or a star on the diagonal makes a clean turn. The project guide to embroidered linen napkins shows how to hoop a corner securely.
Common Problems and Fixes
- The border drifts away from the edge. It was stitched by eye. Always rule the baseline, and measure it from the edge at several points.
- The fabric puckers. Fine linen and cotton pucker when stitches are pulled tight. Ease the tension, and on thin fabric drop to two strands.
- Knots loosen in the wash. They were wrapped loosely. Hold the thread taut until the knot sits on the fabric.
- The back looks untidy. On napkins the back is visible. Keep the thread travel short and trim the woven ends close.
Watch out
Wash and dry the item before you stitch. Linen and cotton often shrink in the first wash, and fabric that shrinks after it is embroidered pulls the border into ripples.
Variations
- Colors: stitch any border in one color for a classic look, such as all white on colored linen or all navy on white.
- Stacking: combine two rows, for example the dash and dot under the wavy vine, spaced about 3/8 in (1 cm) apart.
- Clothing: on cuffs and collars, reduce the repeat and use two strands. Stretch fabrics need a stabilizer, as explained in how to embroider on clothing.
Finishing
Rinse the item in cool water until the baseline and ticks are gone, let it dry, and press it face down on a folded towel so the knots and petals keep their shape. The washing and pressing steps are described in more detail at the start of how to finish the back of an embroidery hoop.
Frequently asked questions
How do I keep an embroidered border straight?
Rule a light baseline parallel to the edge with a water-soluble pen and mark the repeats as small ticks along it. Measure from the edge at several points instead of judging by eye.
Which border is the easiest to start with?
Border 1, the dash and dot, is the quickest. It is a line of running stitch with a French knot in each gap.
How do I take a border around a corner?
Mark the corner first and measure the repeats outward from it along both edges. Then place a single element, such as a leaf or a knot, on the diagonal at the corner.
Should I wash napkins or towels before stitching a border?
Yes. Linen and cotton often shrink in the first wash, and shrinking after stitching pulls the border into ripples.