How to Embroider Linen Napkins with a Corner Sprig
An original corner sprig for linen or cotton napkins, with placement measurements, a way to hoop a corner, and tips for a tidy back that stands up to washing.
Tutorial at a glance
Materials
- Linen or cotton napkins, prewashed and pressed
- 4-inch (10 cm) embroidery hoop
- Six-strand cotton floss in deep green, sage green, and terracotta
- Embroidery needle
- Water-soluble pen and ruler
- Scrap of plain cotton and sewing thread for basting
- Small sharp scissors
Napkins are one of the few embroidery projects where the back matters as much as the front. They get unfolded, used, and washed again and again, so the stitching has to lie flat, the thread ends have to stay put without lumpy knots, and the design has to sit where a fold will not hide it. This corner sprig is built for that: four simple stitches, two strands throughout, and nothing long enough to snag.
It is an easy project for anyone who has worked through the basic embroidery stitches, and a set of four makes a practical first gift.
Choosing and Preparing the Napkins
Pick linen or cotton napkins with a smooth, even weave and a plain hem. Very loose weaves let small stitches sink between the threads, and thick textured cloth makes tracing difficult. Light and mid-tone colors are the easiest to mark.
Wash, dry, and iron the napkins before you do anything else. Linen and cotton can shrink in their first wash, and if that happens after stitching, the fabric tightens around the thread and puckers the design. Prewashing also removes any factory finish that could stop a marking pen from rinsing out cleanly.
What You Need
- Linen or cotton napkins, prewashed and pressed
- A 4-inch (10 cm) embroidery hoop
- Six-strand cotton floss in deep green, sage green, and terracotta
- An embroidery needle suited to 2 strands
- A water-soluble pen and a ruler
- A scrap of plain cotton about 6 in (15 cm) square, plus sewing thread for basting
- Small sharp scissors
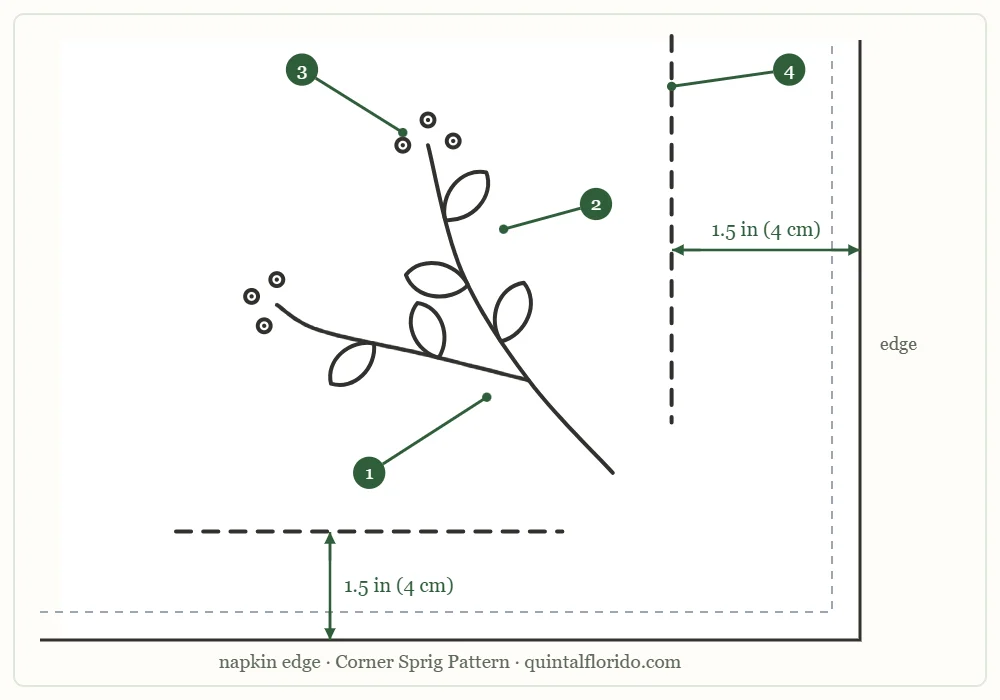
The outline can be printed or traced from the screen and scaled to suit your napkins. A sprig about 2 in (5 cm) long suits a standard dinner napkin; go a little smaller for cocktail napkins.
Stitch and Color Key
| Part | Element | Stitch | Color | Strands |
|---|---|---|---|---|
| 1 | Two-branch sprig stem | Stem stitch | Deep green | 2 |
| 2 | Leaves | Lazy daisy | Sage green | 2 |
| 3 | Berries at the branch tips | French knots | Terracotta | 2 |
| 4 | Dashed edge lines | Running stitch | Sage green | 2 |
Placing and Transferring the Motif
Decide which corner will show when the napkin is folded the way you normally set it, and mark that corner on every napkin in the set. With the ruler, make a small dot 1.5 in (4 cm) in from both edges. That dot is the base of the sprig. The stem grows from it on the diagonal, pointing toward the center of the napkin, and the two dashed lines of part 4 run parallel to the two edges beside it.
Slide the printed outline under the corner, line the base up with your dot, and trace with the water-soluble pen. If the linen is too dense to see through, tape both layers to a window, or use one of the other methods in the guide to transferring embroidery patterns. Test the pen on the hem allowance first and check that it rinses out.
Hooping a Corner
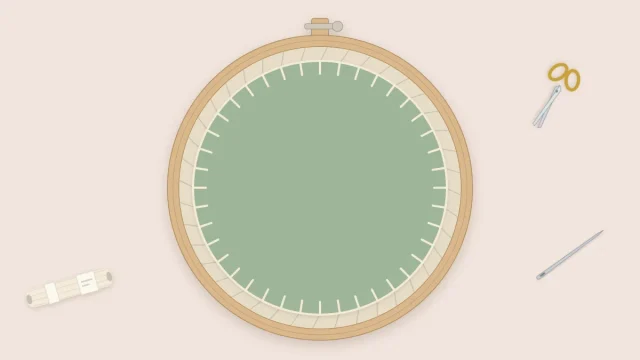
A hoop cannot grip a corner on its own, because fabric fills only part of the ring. Extend the corner temporarily:
- Lay the cotton scrap under the napkin corner so it overlaps the two hemmed edges by about 1/2 in (12 mm) and sticks out beyond them.
- Baste the scrap to the napkin along both edges with long running stitches in sewing thread, stitching through the hem.
- Hoop the napkin and scrap together with the design centered. The hoop now has fabric all the way around.
- When the embroidery is done, snip the basting and pull it out.
Tip
Keep the scrap and reuse it for every napkin in the set. Basting it on takes only a few minutes each time.
Stitching Order
- Part 1, the stem. With 2 strands of deep green, work stem stitch from the base of the sprig up the main branch to its tip, then start again at the fork for the second branch. Keep the working thread on the same side of the needle for every stitch; switching sides breaks the rope-like twist. Stitches of about 1/8 in (3 mm) follow the gentle curve well.
- Part 2, the leaves. Change to 2 strands of sage green. For each lazy daisy, come up at A where the leaf meets the stem, go down again right beside A leaving a loop, come up at B at the leaf tip with the needle inside the loop, and make a tiny stitch over the loop to hold it. Pull the loop only until it lies flat. A tight loop turns into a thin line.
- Part 3, the berries. With 2 strands of terracotta, make a French knot at each branch tip. Come up, wrap the thread twice around the needle, and go down right next to the hole you came up from, not into it, holding the thread taut until the knot sits on the fabric.
- Part 4, the dashed lines. With 2 strands of sage green, work a running stitch along each of the two marked lines. Aim for stitches and gaps of the same length, about 3/16 in (5 mm). Counting fabric threads on linen keeps them even.
Keeping the Back Tidy
The back of a napkin is seen and washed, so skip bulky knots altogether.
- Starting. Leave a 2-inch (5 cm) tail on the back, hold it out of the way for the first few stitches, then thread it onto the needle and weave it under the backs of those stitches.
- Ending. Slide the needle under the backs of four or five stitches, then pass back under the last two in the opposite direction before trimming close.
- Moving between elements. Do not carry thread across open fabric from one leaf or berry to the next. Travel under the back of the stem instead, or end the thread and start again. Loose strands on the back catch on fingers and in the wash.
- Berries. After each French knot, run the thread under a nearby stem stitch on the back before moving on, so one knot coming loose cannot undo the next.
Watch out
Deep green and terracotta are strong colors. If you are unsure whether your floss is colorfast, wet a short length and press it between two layers of white cloth before stitching a whole set.
Common Problems and Fixes
- The corner puckers. The stitches are pulled too tight or the fabric was slack in the hoop. Re-hoop until taut and ease off on the tension.
- The sprig sits crooked. Check the base dot against both edges before tracing. A sprig that is off the diagonal is obvious once the napkin is folded.
- The running stitch wanders. Draw the lines with a ruler and stitch on them. The dashes sit next to a straight hem, so any drift shows.
Washing and Pressing
Rinse the corner in cool water to remove the pen marks, then wash the napkin as you normally would for linen or cotton, on a gentle setting. Iron it while slightly damp, face down on a folded towel, so the leaves and berries keep their shape.
Making a Matching Set
For a set, repeat the placement exactly: same corner, same dot, same sprig size. Stitching all of part 1 across every napkin before moving on to part 2 helps keep the tension consistent. If you would like the napkins to match but still be told apart, change only the berry color on each one, or mirror the sprig on half the set.
The same sprig works on tea towels and pillowcase corners. For other small designs sized for linens, see the mini embroidery motifs, and for longer lines along a hem, the simple border patterns.
Frequently asked questions
Do I need to wash napkins before embroidering them?
Yes. Linen and cotton can shrink in the first wash, and shrinking after stitching puckers the design. Prewashing also helps marking pens rinse out cleanly.
How do I hoop the corner of a napkin?
Baste a scrap of plain cotton to the two edges of the corner so the hoop has fabric to grip all the way around, then remove the basting when the embroidery is finished.
Where should the design sit on the napkin?
Start the base of the sprig about 1.5 in (4 cm) in from both edges of the corner, with the stem pointing diagonally toward the center of the napkin.
How do I secure thread without knots on the back?
Leave a short tail when you start and weave it under the backs of the first stitches. To finish, slide the needle under four or five stitches on the back, pass back under two, and trim.