Easy Sun Embroidery Pattern with Straight-Stitch Rays
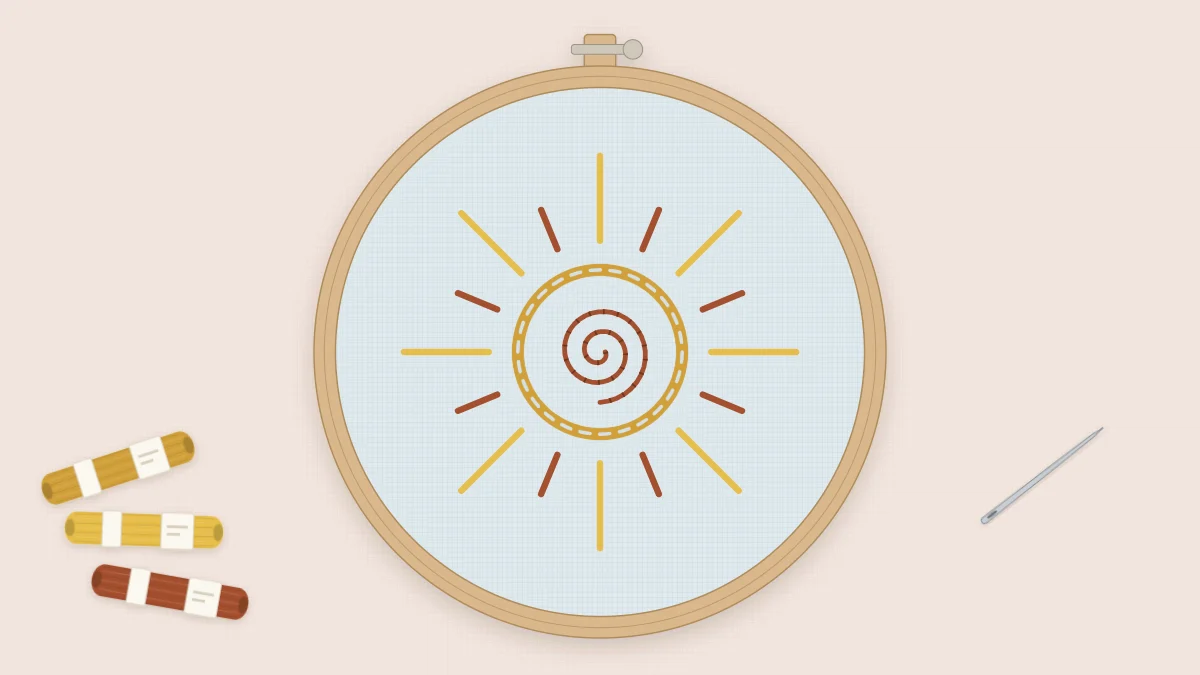
A round sun for a 4-inch hoop with a chain stitch circle, sixteen straight-stitch rays in two colors and a small backstitch spiral.
Tutorial at a glance
Materials
- 4-inch (10 cm) embroidery hoop
- White or pale blue cotton, about 8 in (20 cm) square
- Six-strand cotton floss in mustard, golden yellow and rust
- Embroidery needle with an eye for three strands
- Small sharp scissors
- Water-soluble pen and a short ruler
- Printed or traced pattern outline
Sixteen rays, one circle and a small spiral make up this sun, and all of it is stitched with three of the simplest stitches there are. The circle is a good first try at chain stitch, because a closed ring shows clearly whether the loops are even. The rays are single straight stitches, which teach tension better than any other stitch. The spiral in the middle is a short lesson in taking backstitch around a tight curve. Plan on an evening for the whole piece.
What You Need
- A 4-inch (10 cm) embroidery hoop
- A square of white or pale blue cotton, about 8 in (20 cm) on each side
- Six-strand cotton floss in mustard, golden yellow and rust
- An embroidery needle with an eye that takes three strands
- Small sharp scissors
- A water-soluble pen and a short ruler
- The pattern outline below
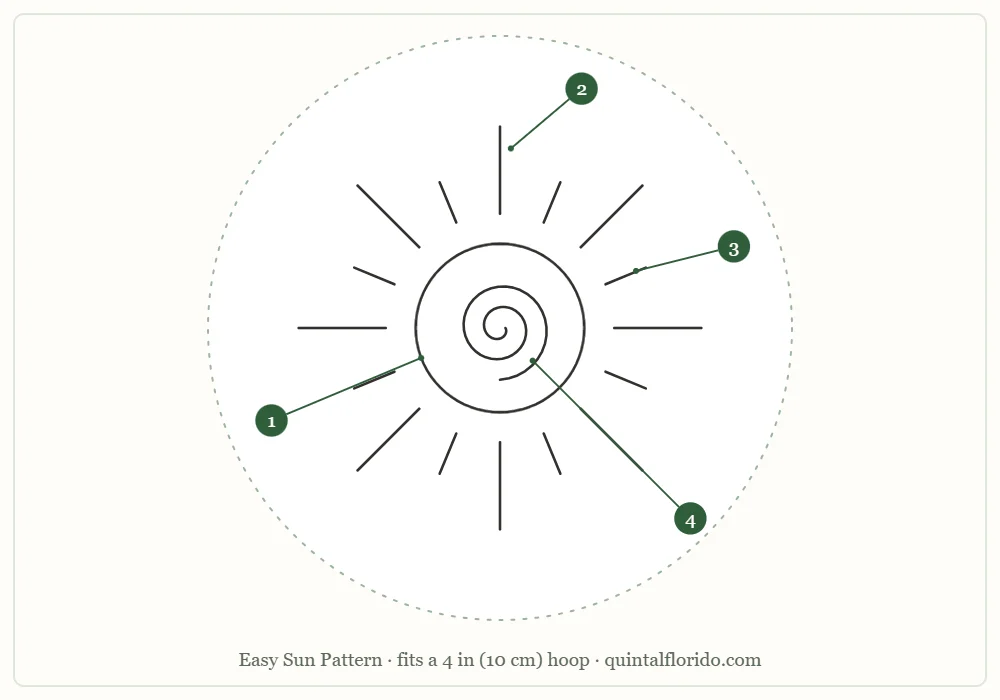
Print the outline or trace it from the screen, scaling it so the outer circle matches the inside of your hoop.
Stitch and Color Key
| Part | Element | Stitch | Color | Strands |
|---|---|---|---|---|
| 1 | Sun circle | Chain stitch | Mustard | 3 |
| 2 | Eight long rays | Straight stitch | Golden yellow | 3 |
| 3 | Eight short rays | Straight stitch | Rust | 3 |
| 4 | Center spiral | Backstitch | Rust | 2 |
Chain stitch and backstitch are both explained with lettered diagrams in the guide to basic embroidery stitches. To separate two or three strands from the skein without tangling, see the embroidery thread guide.
Transferring the Design
White and pale blue cotton are thin enough to trace through against a window. Draw the circle and the spiral freehand over the printed lines, and use the ruler for the rays. Each ray should point at the center of the circle. Laying the ruler across the center and marking two opposite rays at once keeps them aligned. Mark only the two ends of each ray if you prefer, since a single straight stitch will join them. Other options, such as stick-on stabilizer, are covered in how to transfer embroidery patterns.
Stitching Order
Hoop the fabric as tight as a drum. Straight stitches depend on taut fabric more than any other stitch in this design.
- Part 1, the sun circle, in chain stitch. Thread three strands of mustard and come up at A, anywhere on the circle. Go back down at A, in the same hole, leaving a loop on the surface. Come up at B, one stitch length along the line, with the needle inside the loop, and pull until the loop lies flat. Go down again at B, inside the loop you just made, and come up at C for the next link. Keep each link about 1/8 in (3 mm) long so the ring stays round.
- Close the circle. When the last link reaches the first one, do not make another loop. Slide the needle under both threads of the first link without piercing the fabric, then go back down into the hole the thread last came out of. The join becomes one more link and the start disappears.
- Part 2, the eight long rays, in straight stitch. Change to three strands of golden yellow. For each long ray, come up at the outer tip and go down at the end nearest the circle. Pull only until the stitch lies flat on the fabric. On the back, slide the needle under a few chain stitches to reach the next long ray, then come up at its tip. The thread on the back now runs behind the circle and behind the ray itself, where it cannot show.
- Part 3, the eight short rays, in straight stitch. Thread three strands of rust and fill the spaces between the long rays in the same way: up at the tip, down beside the circle, then along the back of the chain stitches to the next one.
- Part 4, the center spiral, in backstitch. Switch to two strands of rust and begin at the outer end of the spiral. Come up one stitch length along the line, go down at the start, come up one stitch length further on and go back down into the previous hole. Shorten the stitches as the curl tightens, down to about 1/16 in (2 mm) at the center.
- Secure the ends. Weave each thread under the back of several stitches of its own color and trim.
Tip
Stitch the ray at the top first, then the one at the bottom, then left and right, before filling in the rest of that color. With four rays in place it is easy to see whether the others are evenly spaced, and to nudge a tip over by a thread or two before it is stitched.
Watch out
Rust thread carried across the back from one ray tip straight to the next shows through white or pale blue cotton as a dark shadow between the rays. Always travel along the back of the chain stitch circle instead.
Common Problems and Fixes
| Problem | Likely cause | Fix |
|---|---|---|
| Chain links are different sizes | Uneven stitch length or uneven pull | Mark small dots along the circle and stop pulling as soon as each loop lies flat |
| The chain looks like a thin line | Loops pulled too tight | Leave each loop slightly relaxed so it keeps its teardrop shape |
| There is a gap or a lump where the circle joins | An extra loop was made at the end | Unpick it and pass the thread under the first link instead |
| Rays sag or lift off the fabric | Slack fabric in the hoop | Tighten the hoop, then snug the stitch from the back |
| The fabric puckers between rays | Straight stitches pulled too hard | Unpick the tight stitch and lay it again with less tension |
| The spiral looks angular | Stitches too long for the curve | Rework the tight section with shorter stitches |
Variations
- Colors: on pale blue fabric the three warm colors look brightest. For a softer sun, stitch every part in golden yellow, or replace rust with terracotta or dusty rose.
- Size: for a 6-inch (15 cm) hoop, enlarge the outline and work each long ray as two or three backstitches. A single straight stitch much longer than about 3/4 in (2 cm) tends to sag.
- Clothing and bags: on anything that will be washed or rubbed, such as a tote bag or a jacket pocket, work all the rays in backstitch. Long loose stitches catch easily in use.
- Smaller motifs: a little sun with a backstitch circle and straight stitch rays is one of the nine designs in the mini embroidery motifs sheet, sized for collars and pockets.
- Extra detail: add a single French knot in golden yellow just beyond the tip of each short ray.
Finishing
Rinse the piece in cool water until the pen marks are gone, paying attention to the ray tips, where lines often extend past the stitches. Let it dry flat and press it face down on a folded towel so the chain stitch keeps its raised texture. Return it to the hoop with the sun centered, tighten the screw, then trim and gather the spare fabric as described in how to finish the back of an embroidery hoop.
Frequently asked questions
How do I join a chain stitch circle neatly?
When the last link reaches the first, slide the needle under both threads of the first link without piercing the fabric, then go back down into the hole the thread last came out of. The join looks like one more link.
Why are my straight-stitch rays loose?
The fabric is probably slack in the hoop. Tighten it until it is drum-tight and pull each stitch only until it lies flat.
How many strands does the sun pattern use?
The circle and all sixteen rays use three strands. The center spiral uses two strands of rust so the tight curve stays neat.
Can I stitch this sun on a tote bag or jacket?
Yes, but work the rays in backstitch instead of single straight stitches. Long loose stitches catch easily on items that are washed and handled.