Modern Rainbow Embroidery Pattern: Five Arches, Five Stitches
A muted five-arch rainbow for a 5-inch hoop in which every arch uses a different line stitch, so the finished piece doubles as a stitch sampler.
Tutorial at a glance
Materials
- 5-inch (13 cm) embroidery hoop
- Cream or oatmeal cotton, about 9 in (23 cm) square
- Six-strand cotton floss in terracotta, mustard, blush pink, sage green and slate blue
- Embroidery needle with an eye large enough for six strands
- Small sharp scissors
- Water-soluble pen and a ruler
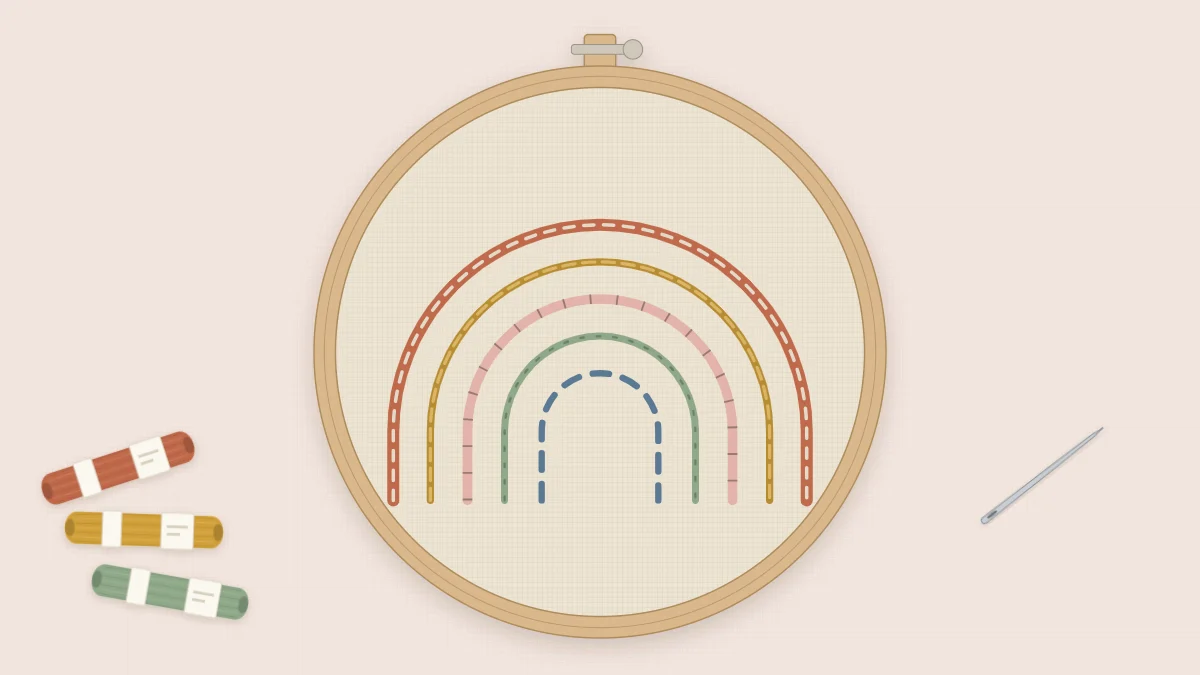
Five arches, five different line stitches: this rainbow is a sampler in disguise. Each arch follows the same curve at a slightly different size, so you see side by side how chain stitch, stem stitch, backstitch, split stitch and running stitch each handle a bend. The muted palette of terracotta, mustard, blush pink, sage green and slate blue keeps it calm enough to hang on a wall afterward.
It is an easy pattern with no fills and no knots. If you have never stitched before, you can start here, with the guide to basic embroidery stitches open beside you for the needle positions. If you already know the stitches, the arches are good practice at keeping stitch length even around a curve.
What You Need
- A 5-inch (13 cm) embroidery hoop
- Cream or oatmeal cotton, about 9 in (23 cm) square
- Six-strand cotton floss in terracotta, mustard, blush pink, sage green and slate blue
- An embroidery needle with an eye large enough for six strands
- Small sharp scissors
- A water-soluble pen and a ruler
Four arches use three strands. The third arch uses all six, which makes it the thickest line in the design. Choose a needle that takes six strands without a struggle; forcing thick floss through a small eye frays it.
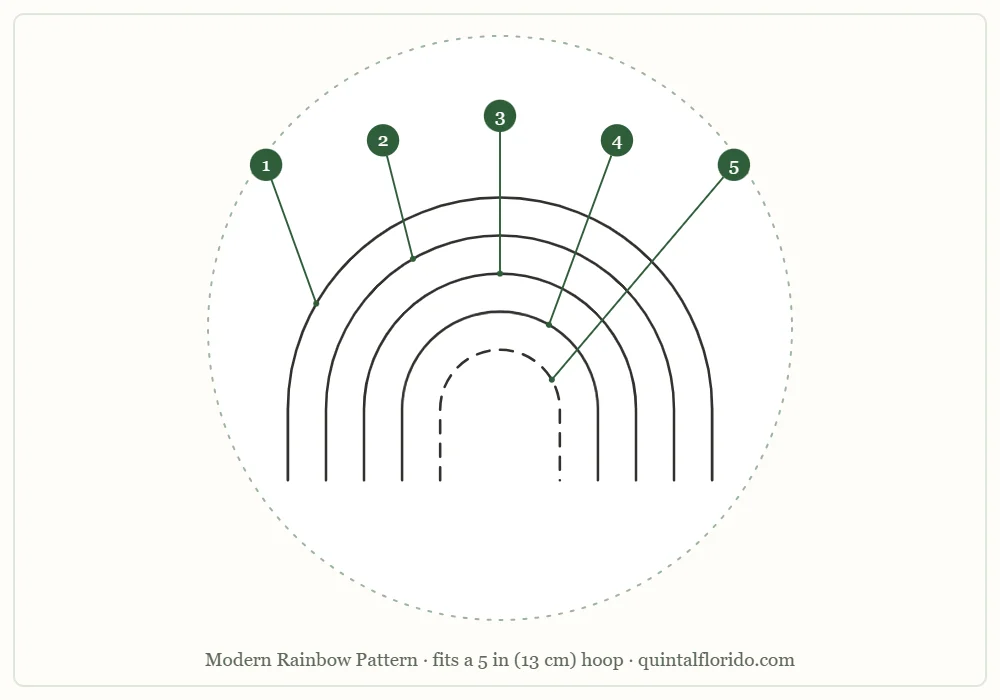
Stitch and Color Key
| Part | Element | Stitch | Color | Strands |
|---|---|---|---|---|
| 1 | Outer arch | Chain stitch | Terracotta | 3 |
| 2 | Second arch | Stem stitch | Mustard | 3 |
| 3 | Third arch | Backstitch | Blush pink | 6 |
| 4 | Fourth arch | Split stitch | Sage green | 3 |
| 5 | Inner arch | Running stitch | Slate blue | 3 |
Transferring the Design
Cream and oatmeal cotton are light enough to trace through at a window or over a lit screen. Draw the five arches with a water-soluble pen, then add one thing the outline does not need but your stitching does: a light ruled baseline across the feet of the arches. Every arch should begin and end on that line. The guide on how to transfer embroidery patterns explains the other methods if tracing does not suit your fabric.
Position the rainbow slightly above the center of the hoop if you plan to add anything below it, or dead center if it will stand alone.
Stitching Order
The arches are numbered from the outside in, but it is easier to stitch them from the inside out. The inner arch is the simplest stitch, and each arch after it adds one new idea.
- Inner arch (part 5), running stitch. With three strands of slate blue, come up at A, go down at B, leave a gap, and come up at C. Keep stitches and gaps the same length, about 1/8 in (3 mm) each. This arch has the tightest curve, so short stitches matter most here.
- Fourth arch (part 4), split stitch. With three strands of sage green, make one short stitch from A to B. Come up at C, halfway back along that stitch, with the needle piercing the middle of the thread, then go down ahead of B. Each new stitch splits the one before it, which gives a fine, braided line.
- Third arch (part 3), backstitch. Thread all six strands of blush pink. Come up at A one stitch length ahead of the start, go down at B at the start, then come up at C a stitch length beyond A and go back down into A. Pull each stitch firmly enough that the thick thread lies flat, and reuse the hole of the previous stitch so the line has no breaks.
- Second arch (part 2), stem stitch. With three strands of mustard, come up at A, go down at B, and come up at C, halfway between them. Keep the working thread on the same side of the needle for every stitch, toward the outside of the curve. One stitch with the thread on the wrong side shows as a flat spot in the twist.
- Outer arch (part 1), chain stitch. With three strands of terracotta, come up at A, go back down at A leaving a loop, and come up at B inside the loop. Go down again at B, inside the link you just made, to begin the next one. At the end of the arch, hold the last loop down with a tiny stitch over its tip.
Tip
Stitch every arch in the same direction, for example left foot to right foot. The stitches that have a slant, such as stem stitch, will then lean the same way across the whole rainbow.
Common Problems and Fixes
- An arch looks angular at the top. The stitches are too long for the curve. Shorten them over the crown of the arch and lengthen them slightly on the straighter sides.
- Uneven gaps between arches. Stay exactly on the drawn line. Chain stitch is wide, so center its links over the line instead of running them along one side of it.
- The six-strand arch looks lumpy. The strands have twisted on themselves. Let the needle hang free every few stitches so the floss can unwind, and smooth the strands flat with a fingertip as you pull through.
- Chain links of different sizes. Mark small dots along the outer arch at even intervals and bring the needle up on a dot each time.
- Ragged feet. End every arch exactly on the baseline. If one runs long, unpick the last stitch and shorten it.
Watch out
Six strands make a large hole in tightly woven cotton. Decide where each backstitch goes before the needle enters the fabric, because unpicked holes from thick floss can stay visible.
Variations
- Colors. Five shades of a single color, darkest outside to lightest inside, make a quieter monochrome rainbow. Classic bright colors work too, as long as the fabric stays neutral. The color planning guide shows how to lay skeins on the fabric and check the balance first.
- Stitches. Once you know the pattern, swap the stitches between arches, or work all five in backstitch with all six strands for a bold, graphic look.
- Additions. A French knot at each foot of each arch, or a small cloud outline at either end, changes the mood without changing the structure.
- Size. Scaled down for a 3-inch (8 cm) hoop, use two strands for the thin arches and three or four for the thick one.
- Other uses. The rainbow suits a child’s sweatshirt, a tote bag or a nursery wall hanging. Running stitch is the least secure of the five in the wash; replace it with backstitch on anything that will be laundered.
Finishing
Plan on an evening for this piece. Rinse away the pen lines and the baseline in cool water, dry the fabric flat and press it face down on a towel. To hang the rainbow in its hoop, trim the fabric and gather it at the back as shown in the guide on how to finish an embroidery hoop.
Frequently asked questions
Which stitches are used in this rainbow?
From the outside in: chain stitch, stem stitch, backstitch, split stitch and running stitch. Each arch uses one stitch, so the piece works as a small sampler of line stitches.
Is this rainbow pattern suitable for a complete beginner?
Yes. It has no fills and no knots, only five line stitches. Stitching from the inner arch outward starts with running stitch, the simplest of the five.
Why is one arch stitched with six strands?
The third arch, in blush pink backstitch, uses all six strands so it is thicker than the others. The other four arches use three strands.
How do I keep the arches smooth?
Use shorter stitches over the top of each arch, where the curve is tightest, and stay exactly on the drawn line. The inner arch needs the shortest stitches of all.