Honeycomb Embroidery Pattern: A Modern Hexagon Design
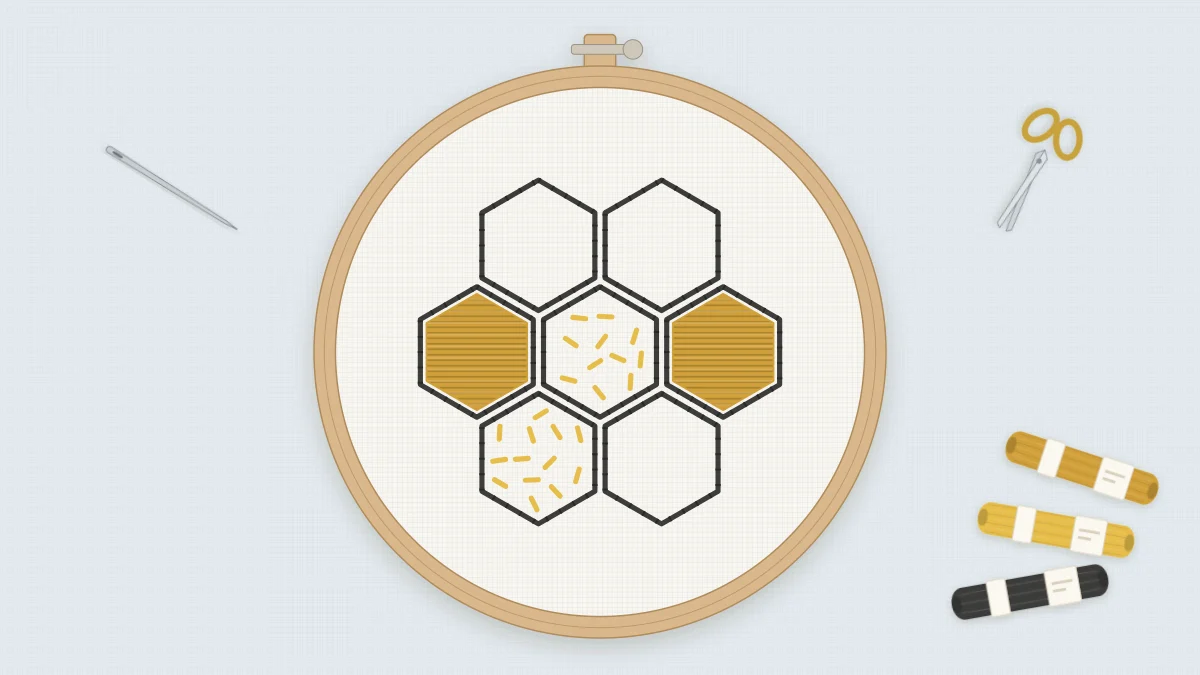
A cluster of seven hexagons for a 4-inch hoop, with two solid cells, two speckled cells and three left open. A good first project for practicing satin stitch and sharp corners.
Tutorial at a glance
Materials
- 4-inch (10 cm) embroidery hoop
- White cotton or natural linen, about 7 in (18 cm) square
- Six-strand cotton floss in charcoal, mustard and golden yellow
- Embroidery needle
- Water-soluble pen or sharp pencil
- Ruler
- Small sharp scissors
Seven hexagons, three stitches, three colors. This honeycomb is a small design, but it asks for two things that take a little practice: straight lines that meet in crisp corners, and a satin stitch fill with tidy edges. That is why it is rated intermediate. If you have already stitched a few outline patterns and want a first try at filling shapes, this is a good next step, because the shapes are small and every edge is straight.
The cluster has one hexagon in the center and six around it. Two are filled solid in mustard, two are speckled with golden yellow seed stitches, and three are left open so the fabric shows through. The mix of solid, speckled and empty cells is what gives the piece its modern look.
What You Need
- A 4-inch (10 cm) embroidery hoop
- White cotton or natural linen, cut to about 7 in (18 cm) square
- Six-strand cotton floss in charcoal, mustard and golden yellow
- An embroidery needle with an eye large enough for three strands
- A water-soluble pen or a sharp pencil, plus a ruler
- Small sharp scissors
A smooth, tightly woven fabric makes this pattern easier. On a loose weave the needle tends to slip into the nearest gap between threads, and straight lines start to wobble.
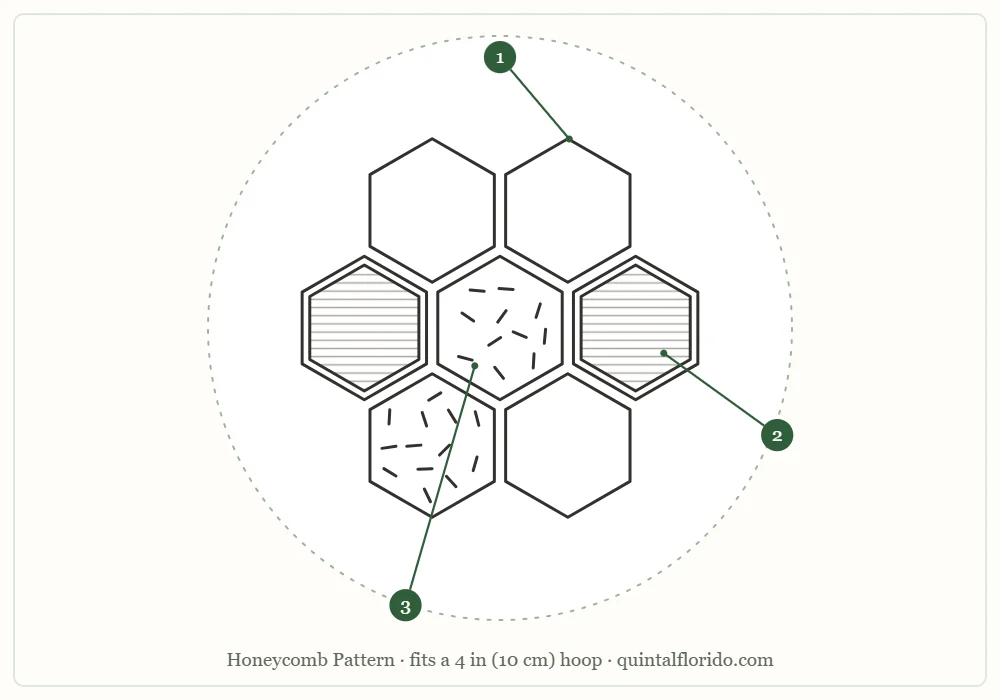
You can print the outline or trace it straight from the screen, and scale it up or down until the cluster sits comfortably inside your hoop with a margin of fabric all around.
Stitch and Color Key
| Part | Element | Stitch | Color | Strands |
|---|---|---|---|---|
| 1 | All hexagon outlines | Backstitch | Charcoal | 2 |
| 2 | Two solid hexagons | Satin stitch | Mustard | 3 |
| 3 | Two speckled hexagons | Seed stitch | Golden yellow | 2 |
Backstitch and satin stitch are both explained step by step in the guide to basic embroidery stitches. Seed stitch is simply a scatter of tiny straight stitches, described below.
Transferring the Design
Geometric patterns show every transfer error, so take your time here. Tape the printed outline to a window or light box, tape the fabric over it with the weave running straight up and down, and trace the lines against a ruler rather than freehand. Mark each corner as a clear dot first, then join the dots. The other methods in the guide on how to transfer embroidery patterns work as well, as long as the lines stay thin.
Mount the fabric in the hoop so it is drum tight, and check that tightening has not pulled the hexagons out of shape. If the cluster looks stretched in one direction, loosen the hoop and ease the fabric back.
Stitching Order
The parts are numbered for the key, not for the order of work. Stitch the fills first and the outlines last, so the charcoal line covers the edge of every fill.
- Part 2, the two solid hexagons. Thread three strands of mustard. Start in the middle of the hexagon with one stitch from the center of one flat side straight across to the center of the opposite side. Fill toward one end, then return to the middle and fill the other half. Keep every stitch parallel to the first, and bring the needle up and down exactly on the drawn line so the edge stays even.
- Part 3, the two speckled hexagons. Thread two strands of golden yellow. Scatter small straight stitches, each about 1/8 in (3 mm) long, across the cell. Turn each one to a different angle from its neighbors and keep the spaces between them roughly equal. Stop just short of the outline so the speckles do not crowd the border.
- Part 1, all hexagon outlines. Thread two strands of charcoal. Backstitch along every line, with stitches about 1/8 in (3 mm) long. Plan the stitch length so a stitch ends exactly at each corner; the needle should go down into the corner dot and come up again from the same dot for the next side.
- Shared sides. Where two hexagons touch, they share one line. Stitch it once only. A simple route is to outline the center hexagon first, then add the outer hexagons one at a time, skipping any side that is already stitched.
- Check the corners. Hold the hoop at arm’s length. If a corner looks rounded, add one tiny stitch into the point to sharpen it.
Tip
For a smoother satin stitch, separate the three strands of floss completely, then lay them back together before threading. The strands lie side by side instead of twisting, and the fill covers the fabric better.
Common Problems and Fixes
The satin stitch edge looks ragged
The needle is wandering either side of the line. Unpick the uneven stitches and place them again on the line itself. The backstitch outline will hide small steps, but not large ones.
Fabric shows between the satin stitches
The stitches are too far apart. Each new stitch should come up right beside the last one, almost touching it. You can slip an extra stitch into a gap as long as it stays parallel with the rest.
The fabric puckers under a solid hexagon
The thread is being pulled too tight. Satin stitches should rest on the surface, not grip it. Tighten the hoop again and ease your tension.
The seed stitches look like rows
It is easy to fall into a pattern without noticing. Work from the middle of the cell outward and rotate the hoop a quarter turn now and then to break the rhythm.
Watch out
Do not carry charcoal thread across the back of an open hexagon. On white cotton or pale linen the dark strand shows through from the front. Run it under the back of existing stitches instead, or end the thread and start again.
Variations
- Change the palette. Try sage green and cream for a quieter look, or a single color in three strengths: outlines in the darkest, satin in the middle tone, speckles in the lightest.
- Move the fills. Which cells are solid, speckled or open is up to you. Keep at least two open so the design can breathe.
- Enlarge with care. At the 4-inch size the longest satin stitches are already close to the limit of what lies flat, and longer ones tend to snag and sag. If you scale the pattern up for a bigger hoop, fill the solid cells with rows of split stitch or chain stitch instead. The guide on how to choose embroidery stitches compares the options.
- Add a visitor. The tiny bee pattern is drawn at a similar scale and sits well beside the cluster or in a matching hoop.
- Use a single hexagon. One cell with a speckled fill makes a neat mark on a napkin corner or a shirt pocket.
Finishing
Rinse or dab away the transfer lines as the pen instructions describe, let the fabric dry flat, and press it face down on a folded towel so the satin stitch is not flattened. To display the piece in its hoop, center the cluster, tighten the screw, and close the back following the guide on how to finish an embroidery hoop. Plan on two or three relaxed sessions for the whole piece; the satin fills take the longest.
Frequently asked questions
Should I stitch the hexagon outlines or the fills first?
Stitch the satin stitch and seed stitch fills first and the charcoal backstitch outlines last. The outline then covers the edge of each fill and gives a clean border.
How do I get sharp corners in backstitch?
Plan your stitch length so that a stitch ends exactly at each corner point. Take the needle down into the corner and bring it up from the same point to begin the next side.
Can I make this pattern bigger?
Yes, but the satin stitches are already fairly long at the 4-inch size, and longer ones tend to snag and sag. On an enlarged version, fill the solid hexagons with rows of split stitch or chain stitch instead.
What is seed stitch?
Seed stitch is a fill made of small straight stitches scattered at different angles with even gaps between them. It gives a light, speckled texture rather than solid coverage.