Tiny Bee Embroidery Pattern for a 3-Inch Hoop
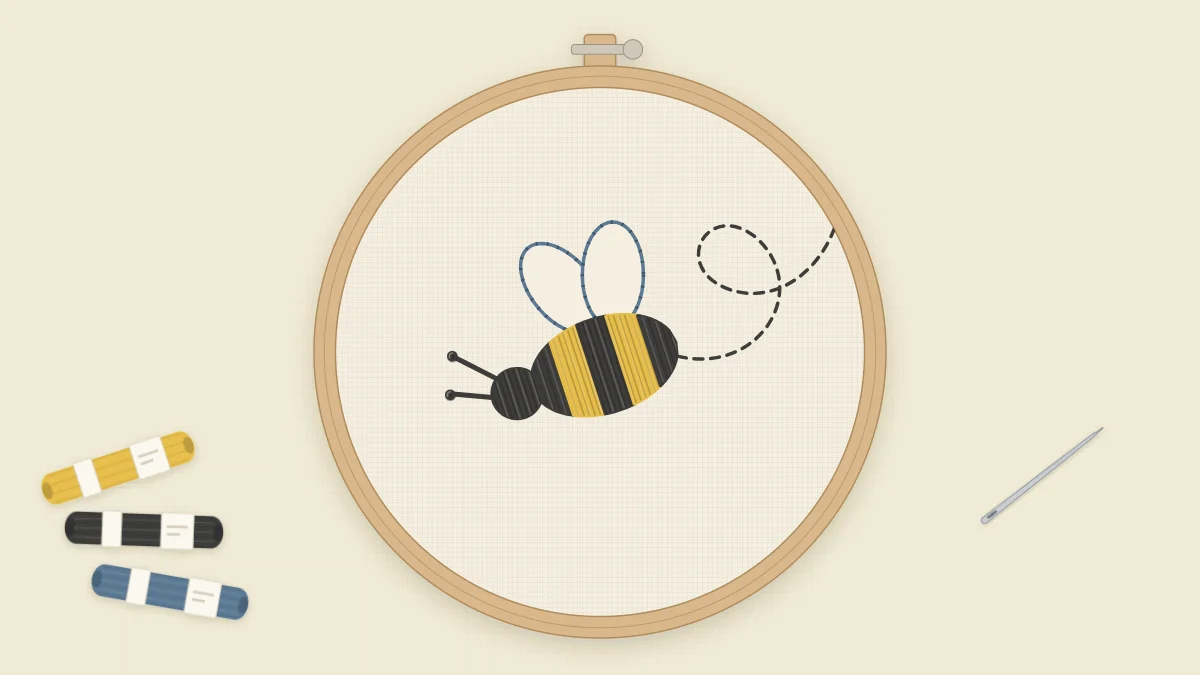
A small striped bumblebee with a dashed looping flight trail, sized for a 3-inch hoop. Five numbered parts and five easy stitches make it a good one-sitting project.
Tutorial at a glance
Materials
- 3-inch (7.5 cm) embroidery hoop
- White or cream cotton, about 6 in (15 cm) square
- Six-strand cotton floss in golden yellow, charcoal and slate blue
- Fine embroidery needle
- Water-soluble pen or sharp pencil
- Small sharp scissors
A 3-inch hoop leaves no room for complicated stitching, which is exactly why this bee works as a beginner project. The body is a row of short satin stitch stripes, the wings are a single-strand outline, and the looping flight trail is nothing more than running stitch. You can finish it in one sitting, and it is small enough to repeat on a collar, a tote bag or a gift tag once you have stitched it in the hoop.
The bee is seen from above at a slight angle: a striped oval body, two rounded wings, two antennae, and a dashed trail curling away behind it. It suits anyone who has tried backstitch and wants a gentle introduction to satin stitch, since each stripe is only a few stitches wide.
What You Need
- A 3-inch (7.5 cm) embroidery hoop
- White or cream cotton, cut to about 6 in (15 cm) square
- Six-strand cotton floss in golden yellow, charcoal and slate blue
- A fine embroidery needle
- A water-soluble pen or a sharp pencil
- Small sharp scissors
Choose a cotton with a close, even weave. The wings and trail are stitched with one strand, and fine lines look best on a smooth surface.
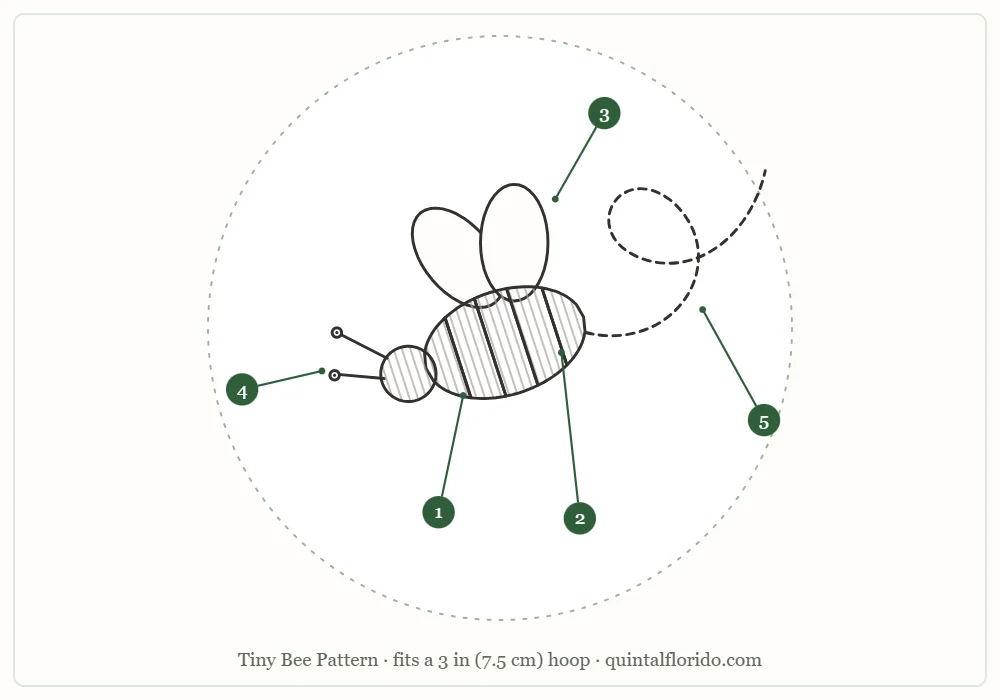
Print the outline or trace it directly from the screen. Scale it so the bee and its trail fit inside the hoop with a clear margin; the body should end up roughly the length of a fingernail.
Stitch and Color Key
| Part | Element | Stitch | Color | Strands |
|---|---|---|---|---|
| 1 | Body stripes, yellow | Satin stitch | Golden yellow | 3 |
| 2 | Body stripes, dark, and the head | Satin stitch | Charcoal | 3 |
| 3 | Two wings | Backstitch outline | Slate blue | 1 |
| 4 | Antennae | Straight stitch with a French knot at each end | Charcoal | 2 |
| 5 | Flight trail | Running stitch | Charcoal | 1 |
If any of these are new to you, the guide to basic embroidery stitches shows running stitch, backstitch, satin stitch and the French knot with needle positions.
Transferring the Design
White or cream cotton is thin enough to trace through. Tape the outline to a window or light box, lay the fabric over it and trace with a fine water-soluble pen. Draw the stripe divisions across the body as well as the outline; they are your guide for changing color. For the trail, a single thin curved line is enough, since the dashes come from the stitch itself. Other options are covered in the guide on how to transfer embroidery patterns.
Keep the lines light. On a motif this small, a heavy pen line can be wider than the single strand that is supposed to cover it.
Stitching Order
- Part 1, the yellow stripes. Thread three strands of golden yellow. Work each stripe in satin stitch with the stitches running along the length of the body, from one stripe line to the next. Each stitch is short, so it lies flat easily. Start in the middle of a stripe and work out to each side of the body, following the curve of the oval.
- Part 2, the dark stripes and the head. Change to three strands of charcoal and fill the remaining stripes the same way. Bring the needle up at the far end of the stripe and take it down into the edge of the yellow, sharing the holes of the yellow stitches so no fabric shows between colors. Fill the small rounded head with satin stitches in the same direction.
- Part 3, the two wings. Thread one strand of slate blue. Outline each wing in backstitch with tiny stitches, about 1/16 in (2 mm), so the rounded tips stay smooth. Begin and end each wing where it meets the body.
- Part 4, the antennae. Thread two strands of charcoal. Make one straight stitch for each antenna, from the head outward. Then come up at the outer tip, wrap the thread twice around the needle and go down right beside the hole you came up from, not into it, to set a French knot on the tip of each antenna.
- Part 5, the flight trail. Thread one strand of charcoal. Follow the looping line in running stitch, with stitches and gaps of equal length, about 1/8 in (3 mm). Shorten both slightly as you go around the loop so the curve stays round.
Tip
Stitching the yellow first matters. If a few fibers of charcoal get dragged into a pale color they show, but yellow caught under a dark stripe disappears.
Common Problems and Fixes
The body looks lumpy at the sides
Satin stitches at the edge of an oval need to get shorter to follow the curve. Place the outermost stitch of each stripe right on the drawn outline, even if it is only a tiny stitch.
A gap shows between stripes
The two colors are not sharing holes. Add a few charcoal stitches that go down into the very edge of the yellow. Charcoal covers small gaps better than yellow does.
The French knot pulls through to the back
The needle went back down the same hole. Take it down one or two fabric threads away, and hold the wrapped thread taut with your other hand until the knot sits on the surface.
The trail thread shows through the fabric
With running stitch, the thread on the back fills each gap on the front, and dark thread can shadow through thin cotton. Keep the gaps no longer than the stitches, or back the fabric with a second layer of cotton in the hoop.
Watch out
Do not carry the charcoal thread across the back from the body to the start of the trail. The strand would cross open fabric and show from the front. End the thread behind the body and start again at the trail.
Variations
- Softer colors. Swap charcoal for dark brown and golden yellow for mustard for a warmer, more muted bee.
- Filled wings. Add two or three straight stitches inside each wing, fanning out from the body, to suggest veins.
- A swarm. Trace the bee three times at different angles in a larger hoop and let the trails cross.
- With honeycomb. The bee pairs naturally with the honeycomb pattern, either in a matching hoop or stitched beside the cluster.
- On clothing. A single bee sits well on a shirt collar or pocket. Read how to embroider on clothing first, since stretch fabrics need a stabilizer.
Finishing
Remove the pen lines with cold water as the pen instructions direct and let the fabric dry. Press from the back on a folded towel so the knots and satin stitch keep their shape. Then center the bee in the hoop, leaving a little more space on the trail side, and close the back by following how to finish an embroidery hoop. Plan on one to two hours from tracing to trimming.
Frequently asked questions
Which part of the bee should I stitch first?
Stitch the golden yellow stripes first, then the charcoal stripes and head. Dark fibers dragged into a pale color show, so the light color goes down before the dark one.
How many strands should I use for the wings?
Use a single strand of slate blue in backstitch. One strand keeps the wings light and delicate next to the solid three-strand body.
Can I stitch this bee on a shirt or tote bag?
Yes. The motif is small enough for a collar, pocket or bag. Use a stabilizer on stretch fabrics and secure thread ends well, because the piece will be washed.
Why does my French knot disappear to the back?
The needle went back into the hole it came up from. Take it down right beside that hole instead, and keep the wrapped thread taut until the knot is set.