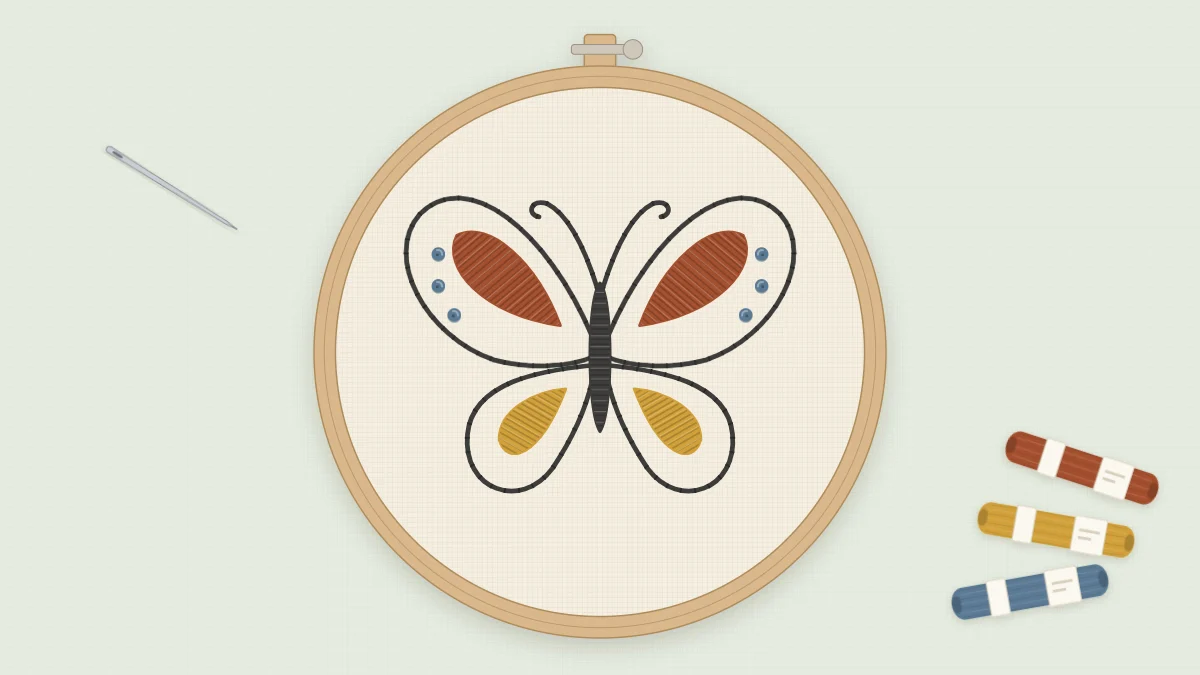
Butterfly Embroidery Pattern: Simple Outline with Filled Wing Bands
An original butterfly design for a 5-inch hoop, with backstitch wings, small satin stitch teardrops, and French knot dots. A steady step up from line-only patterns.
Tutorial at a glance
Materials
- 5-inch (13 cm) embroidery hoop
- White or cream cotton, about 8 in (20 cm) square
- Six-strand cotton floss in charcoal, rust, mustard, and slate blue
- Embroidery needle
- Water-soluble pen or sharp pencil
- Small sharp scissors
A butterfly is a good second or third project because it asks for one new skill at a time. The wings are a plain backstitch outline, and the only filled areas are six small teardrops, so you get to practice satin stitch on shapes that are too small to go badly wrong. The design is symmetrical, which also trains your eye: whatever you do on the left wing, you repeat as a mirror image on the right.
This pattern suits a stitcher who is comfortable with backstitch and has tried a French knot or two. If satin stitch is new to you, read its section in the guide to basic embroidery stitches first and work a few practice leaves on a scrap.
What You Need
- A 5-inch (13 cm) embroidery hoop
- White or cream cotton, cut to about 8 in (20 cm) square
- Six-strand cotton floss in charcoal, rust, mustard, and slate blue
- An embroidery needle with an eye large enough for three strands
- A water-soluble pen or a sharp pencil for transferring
- Small sharp scissors
Plan on two evenings: one for the outlines and wing bands, one for the body, knots, and finishing. That is an estimate, and satin stitch goes faster once your hands settle into it.
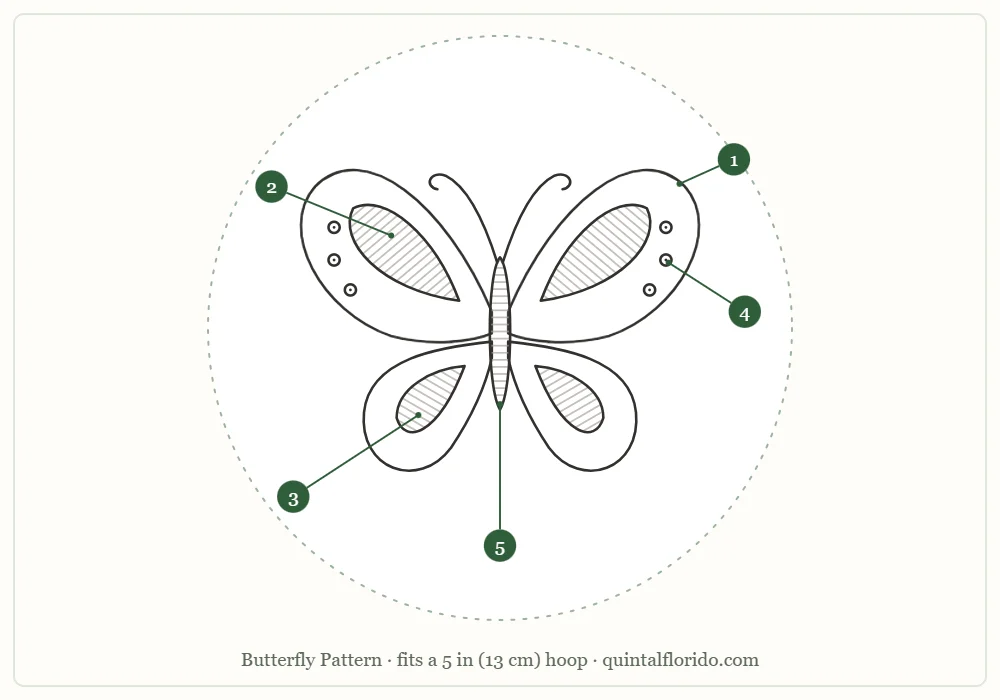
The outline can be printed or traced straight from the screen. Scale it so the wingspan leaves about 3/4 in (2 cm) of empty fabric inside the hoop on each side.
Stitch and Color Key
| Part | Element | Stitch | Color | Strands |
|---|---|---|---|---|
| 1 | Wing outlines | Backstitch | Charcoal | 2 |
| 2 | Teardrop bands inside the upper wings | Satin stitch | Rust | 3 |
| 3 | Teardrops inside the lower wings | Satin stitch | Mustard | 3 |
| 4 | Dots near the upper wing edges | French knots | Slate blue | 3 |
| 5 | Body and antennae | Satin stitch body, backstitch antennae | Charcoal | 3 |
Transferring the Design
White and cream cotton are thin enough to trace through. Tape the printed outline to a window or a lit screen, tape the fabric over it with the grain running straight up and down, and trace with a light hand. Line the body up with the grain of the fabric so the butterfly does not lean. The guide to transferring embroidery patterns covers other methods if your fabric is heavier.
Mark the three dots on each upper wing as tiny points, not circles. A French knot covers very little fabric, and a drawn circle may show around it.
Stitching Order
- Part 1, the wing outlines. Backstitch all four wings with 2 strands of charcoal. Keep the stitches about 1/8 in (3 mm) long on the straighter edges and shorten them on the tight curves of the lower wings, so the curve stays round instead of turning into a row of corners. Start each wing where it meets the body; the body will cover those starting points later.
- Part 2, the upper wing bands. Fill the two rust teardrops with satin stitch using 3 strands. Make the first stitch across the widest part of the teardrop, come up at A on one edge and go down at B on the opposite edge, then work toward the point, and return to the middle to fill the other half. Starting in the middle keeps the angle steady.
- Part 3, the lower wing teardrops. Fill these the same way with 3 strands of mustard. They are smaller, so each one needs only a handful of stitches. Slant the stitches on the left teardrop and the right teardrop as mirror images of each other.
- Part 5, the body and antennae. With 3 strands of charcoal, satin stitch the slim body with short stitches running across its width, from the tail up to the head. Then backstitch each antenna with the same thread, using very short stitches around the curl at the tip.
- Part 4, the dots. Finish with the six slate blue French knots, 3 strands, three near the edge of each upper wing. Come up at the dot, wrap the thread twice around the needle, and go down right next to the hole you came up from, not into it. Keep the wraps snug against the fabric with your free hand until the thread has pulled through.
The knots come last on purpose. Working thread catches on raised knots, and the hoop can flatten them if you need to shift the fabric.
Tip
For a crisper edge on the teardrops, outline each one in small split stitches with the same color before filling it, then lay the satin stitches just over that outline. The padding lifts the fill slightly and hides the drawn line.
Common Problems and Fixes
The satin stitch looks gappy or ragged
Gaps mean the stitches are too far apart; each new stitch should lie right against the last one. A ragged edge usually comes from stitches ending on either side of the drawn line. Aim to come up and go down exactly on the line, or just outside it. If the strands twist, let the needle hang so the thread can unwind.
The fabric puckers around the teardrops
Satin stitch pulls fabric together when it is tugged tight. Keep the fabric drum-tight in the hoop and stop pulling the moment the stitch lies flat.
The wings do not match
Small differences are expected in handwork. If one wing looks clearly larger, compare your backstitch to the traced line: drifting outside the line on one side is the usual cause. Unpick only that section and restitch it.
A French knot pulls through to the back
The needle went back into the same hole. Move over by one or two fabric threads so the knot has something to sit on.
Watch out
Charcoal floss carried across the back of white cotton can show through as a gray shadow. End the thread at each antenna and each wing instead of jumping across open fabric.
Variations
- Colors. Swap rust and mustard for two shades of one color, such as deep blue and pale blue, for a calmer look. Keep the outline dark so the wing shape reads clearly. The guide to planning embroidery colors explains how to pick a set that works together.
- Size. Reduced to about 2 in (5 cm) wide, the butterfly works on a collar or pocket. At that size, drop to 1 strand for the outline and 2 for the fills, and replace the three dots with one.
- Grouping. Stitch it above the daisy pattern in a larger hoop, tilted slightly as if it were about to land.
- Outline only. Skip parts 2 and 3 and you have a quick line design in backstitch and knots.
Finishing
Rinse out the transfer marks in cool water, let the piece dry flat, and press it face down on a folded towel so the satin stitch and knots keep their height. Then center it in the hoop and close the back as shown in the guide to finishing an embroidery hoop.
Frequently asked questions
Is this butterfly pattern suitable for a complete beginner?
It is rated intermediate because of the satin stitch fills. A beginner who has practiced backstitch and tried satin stitch on a scrap can manage it, since the filled shapes are small.
How many strands of floss should I use for the butterfly?
Use 2 strands of charcoal for the wing outlines and 3 strands for everything else: the rust and mustard satin stitch, the slate blue French knots, and the charcoal body and antennae.
Why do the French knots go on last?
Raised knots catch the working thread and can be flattened if the hoop is moved over them, so it is easier to add them once all the flat stitching is done.
How do I keep both wings the same?
Trace carefully with the body lined up on the fabric grain, stitch exactly on the traced line, and mirror the slant of the satin stitches from one side to the other.