Lazy Daisy Embroidery Pattern: Three Daisies in a Hoop
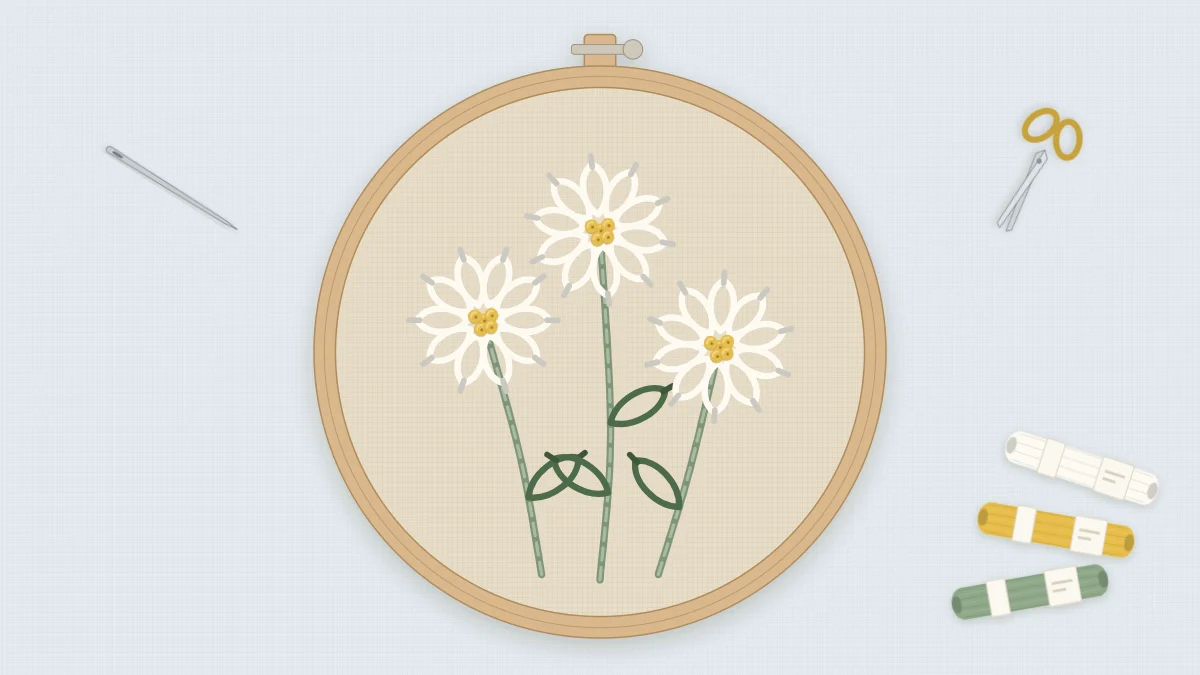
Three daisies on curved stems for a 5-inch hoop, stitched with stem stitch, lazy daisy and French knots. A first floral pattern with a full stitch and color key.
Tutorial at a glance
Materials
- 5-inch (13 cm) embroidery hoop
- Natural linen or sage green cotton, about 9 in (23 cm) square
- Six-strand cotton floss in sage green, deep green, warm white and golden yellow
- Embroidery needle with an eye that takes three strands
- Small sharp scissors
- Water-soluble pen or sharp pencil
Lazy daisy is the stitch that turns a single loop of thread into a petal, and a daisy is the most direct way to practice it: thirty petals in this design, plus a handful of leaves made with the same movement. Three flowers stand at different heights on gently curved stems, the tallest in the middle. The pattern suits anyone who has already tried a line stitch or two and wants a first floral piece. By the end you will have repeated the petal loop often enough that it stops feeling awkward.
The design uses three stitches only: stem stitch, lazy daisy and French knot. If any of them is new to you, the step-by-step descriptions in the guide to basic embroidery stitches are worth a look before you thread the needle.
What You Need
- A 5-inch (13 cm) embroidery hoop
- A square of natural linen or sage green cotton, about 9 in (23 cm) on each side
- Six-strand cotton floss in sage green, deep green, warm white and golden yellow
- An embroidery needle with an eye large enough for three strands
- Small sharp scissors
- A water-soluble pen or a sharp pencil for marking
Every part of this pattern is stitched with three strands, so you can cut a length of floss, split it in half and use both halves. A length about as long as your forearm, roughly 18 in (45 cm), is easier to manage than a long one.
Watch out
White petals disappear on white fabric. Choose natural linen, sage green cotton or any other fabric with some color in it, so the warm white floss has something to stand out against.
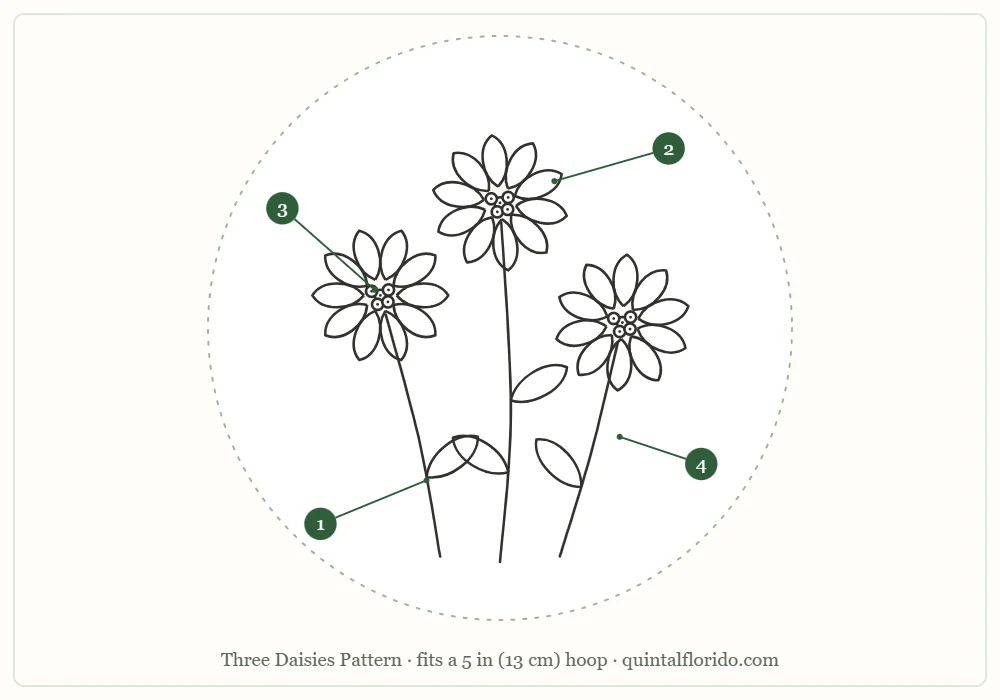
Stitch and Color Key
| Part | Element | Stitch | Color | Strands |
|---|---|---|---|---|
| 1 | Three stems | Stem stitch | Sage green | 3 |
| 2 | Petals, ten per flower | Lazy daisy | Warm white | 3 |
| 3 | Flower centers | Cluster of French knots | Golden yellow | 3 |
| 4 | Leaves on the stems | Lazy daisy, long, with a longer anchor stitch | Deep green | 3 |
Transferring the Design
Both recommended fabrics are light enough to trace through. Tape the printed outline to a window or a lit screen, tape the fabric over it and draw the lines with a water-soluble pen. For the petals you only need two marks each: a dot at the base, on the edge of the center circle, and a dot at the tip. Drawing the full petal outline leaves more ink to remove later, and white floss does not hide stray lines well. The other options are compared in the guide on how to transfer embroidery patterns.
Center the design, then hoop the fabric so it is drum-tight. Loops are much easier to control on a taut surface.
How the Lazy Daisy Petal Works
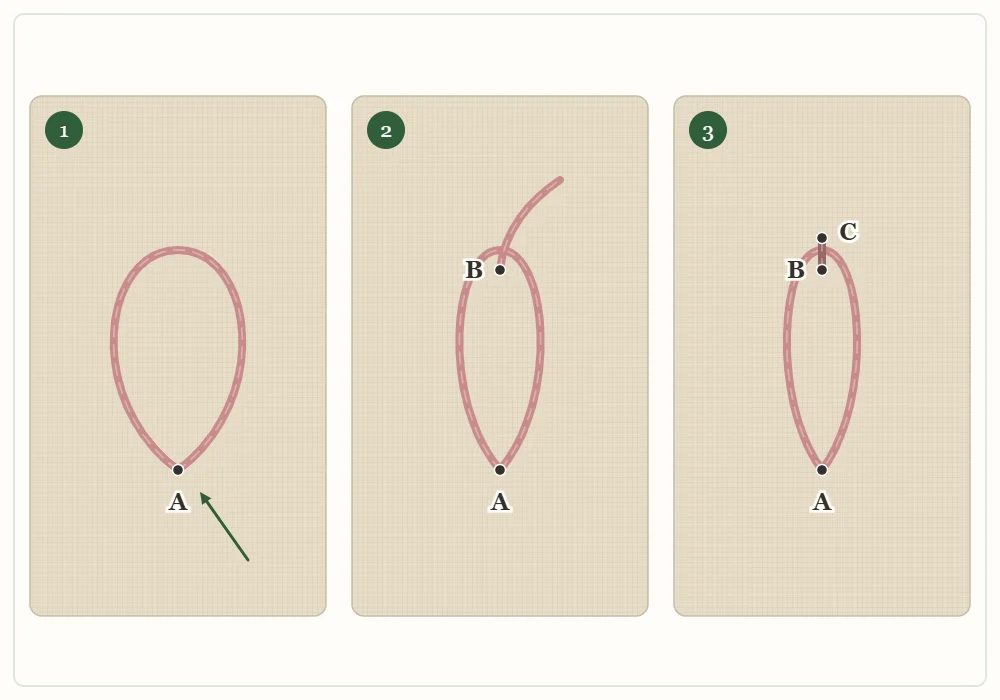
A lazy daisy is a single detached chain stitch. The diagram below shows the three movements. Come up at A, the base of the petal. Go back down at A, in the same hole or a thread beside it, and leave a loop on the surface. Come up at B, the tip of the petal, with the needle inside the loop. Pull gently until the loop lies flat against the fabric, then make a tiny stitch over the end of the loop to hold it in place.
Stitching Order
- Stems (part 1). With three strands of sage green, work stem stitch from the bottom of each stem up to the edge of the center circle. Keep the working thread on the same side of the needle for every stitch. If it swaps sides, the rope-like twist breaks. Shorten the stitches a little where a stem curves.
- Leaves (part 4). Switch to deep green. Each leaf is one long lazy daisy with A at the stem and B at the leaf tip. Make the anchor stitch longer than usual, about 1/8 in (3 mm), so the leaf ends in a point instead of a round tip.
- Petals (part 2). With warm white, work ten petals around each center circle. Stitch the top petal first, then the one directly opposite, then fit four petals into each side. Placing opposite petals first keeps the spacing even and stops the last petal from being squeezed into a gap that is too small.
- Centers (part 3). Fill each center circle with golden yellow French knots. For each knot, come up at A, wrap the floss twice around the needle, and go down right next to A, not into the same hole, keeping the wraps snug while you pull through. Start with a ring of knots around the edge so they cover the petal bases, then fill toward the middle.
End the thread after each flower. A strand carried across the back from one daisy to the next can show through light fabric as a shadow.
Tip
Stop pulling a petal loop as soon as it lies flat. A loop pulled tight collapses into a narrow line, and a daisy needs plump, open petals.
Common Problems and Fixes
- Thin, pinched petals. The loop was pulled too hard. Slide the needle under it and ease a little thread back before making the anchor stitch.
- Petals of different lengths. Mark every tip dot before you start, and check them against the pattern. Uneven tips are far more visible than uneven bases, which the knots will cover.
- A knot that vanishes to the back. The needle went down into the hole it came up from. Go down a thread or two away so the knot has fabric to sit on.
- Loose, loopy knots. Hold the working thread taut with your other hand until the needle is almost all the way through.
- A stem that looks jagged. The stitches are too long for the curve. Shorter stitches follow a bend more smoothly.
Variations
- Colors. Pale yellow petals with a rust center give a different flower entirely, and dusty rose or lavender petals work just as well. On navy or charcoal fabric, bright white petals stand out sharply. The guide to planning colors for a pattern explains how to test a combination before stitching.
- Size. Scaled down for a 4-inch (10 cm) hoop, the petals look better with two strands. Scaled up, add an eleventh or twelfth petal so the flowers do not look sparse.
- Single motif. One daisy without its stem makes a small motif for a collar point, a pocket or the corner of a napkin.
Finishing
Rinse out the pen marks in cool water, following the instructions for your pen, and let the fabric dry flat. Press it face down on a folded towel so the knots are not flattened. Plan on an afternoon or evening for the stitching itself. To display the piece in its hoop, trim the fabric to a circle and gather it at the back as described in the guide on how to finish an embroidery hoop.
Frequently asked questions
Can I stitch this daisy pattern on white fabric?
The warm white petals will barely show on white fabric. Use natural linen, sage green cotton or another fabric with some color, or change the petal color to pale yellow or dusty rose.
How many strands of floss do the petals need?
Three strands at the pattern's 5-inch size. If you scale the design down for a 4-inch (10 cm) hoop, two strands keep the petals in proportion.
Why do my lazy daisy petals look thin?
The loop was pulled too tight before it was anchored. Stop pulling as soon as the loop lies flat on the fabric, then make the small anchor stitch.
In what order should I stitch the daisies?
Stems first, then leaves, then petals, and the French knot centers last. The knots cover the petal bases and are less likely to be flattened if they go in at the end.