Easy Leaf Sprig Embroidery Pattern for Your First Hoop
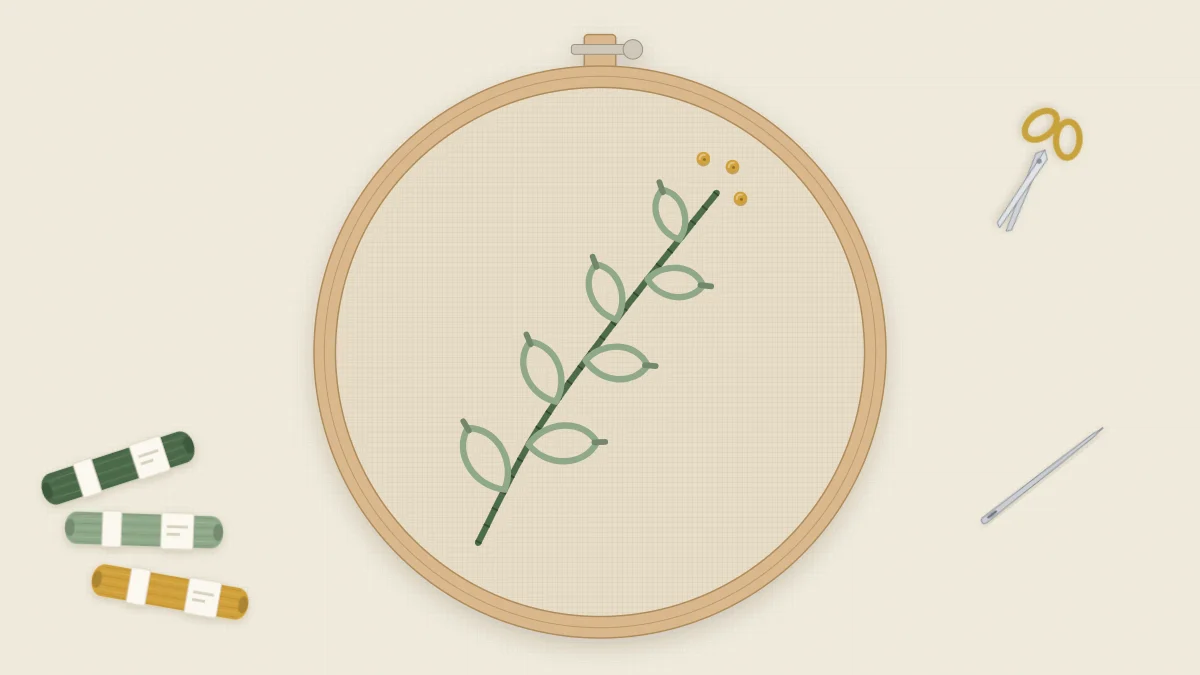
A first-hoop pattern in three stitches: a backstitch stem, seven lazy daisy leaves and three French knot buds, sized for a 4-inch hoop.
Tutorial at a glance
Materials
- 4-inch (10 cm) embroidery hoop
- Natural linen or cotton, about 8 in (20 cm) square
- Six-strand cotton floss in deep green, sage green and mustard
- Embroidery needle with an eye for three strands
- Small sharp scissors
- Water-soluble pen or sharp pencil
- Printed or traced pattern outline
Three stitches, three colors and roughly one evening: this leaf sprig is designed as a first hoop. The curved stem teaches backstitch, each of the seven leaves is a single lazy daisy, and three French knots at the tip finish the design. Nothing is filled in solid, so there is little that can go wrong, and every stitch you learn here appears again in almost every other pattern on the site. If you have never threaded an embroidery needle, read how to start hand embroidery first, then come back.
What You Need
- A 4-inch (10 cm) wooden or bamboo embroidery hoop
- A square of natural linen or cotton, about 8 in (20 cm) on each side
- Six-strand cotton floss in deep green, sage green and mustard
- An embroidery needle with an eye large enough for three strands
- Small sharp scissors
- A water-soluble pen or a sharp pencil for marking the fabric
- The pattern outline below
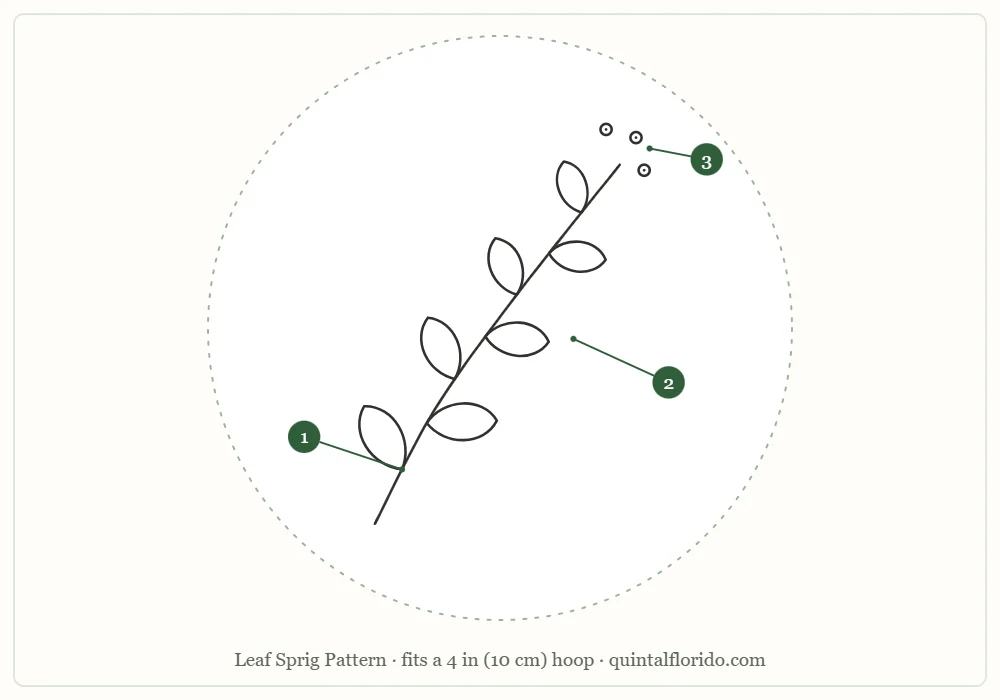
You can print the outline or trace it straight from the screen, and scale it up or down until the circle matches the inside of your hoop.
Stitch and Color Key
| Part | Element | Stitch | Color | Strands |
|---|---|---|---|---|
| 1 | Main stem | Backstitch | Deep green | 3 |
| 2 | Seven leaves | Lazy daisy, one detached chain per leaf | Sage green | 3 |
| 3 | Three buds at the tip | French knots | Mustard | 3 |
All three stitches are shown with diagrams in the guide to basic embroidery stitches.
Transferring the Design
On light linen or cotton, tracing is the simplest method. Tape the printed outline to a window, tape the fabric over it with the sprig centered, and draw over the lines lightly. Mark the stem as one line, each leaf as a short line from base to tip, and each bud as a dot. A leaf drawn as a full outline is harder to cover with a single loop. Other methods, including ones for thick fabric, are compared in how to transfer embroidery patterns.
Place the fabric in the hoop and tighten it until it is taut like a drum, with the weave straight.
Stitching Order
Cut each length of floss about 18 in (45 cm) long, roughly the length of your forearm. Separate three strands by pulling them out one at a time, then lay them back together.
- Part 1, the main stem, in backstitch. Thread three strands of deep green and start at the base of the stem, lower left. Come up at A, one stitch length along the line, and go down at B, at the very start of the line. Come up at C, one stitch length beyond A, and go back down into A, in the same hole. Repeat to the tip. Keep each stitch about 1/8 in (3 mm) long. On the curve, shorter stitches keep the line smooth.
- Part 2, the seven leaves, in lazy daisy. Switch to three strands of sage green and begin with the lowest leaf. Come up at A, where the leaf meets the stem. Go back down at A, in the same hole or a thread away, and leave a loop on the surface. Come up at B, the leaf tip, with the needle inside the loop. Pull gently until the loop lies flat and rounded, then go down just outside the loop to hold it with a tiny stitch. Work up the stem, alternating left and right as drawn.
- Part 3, the three buds, in French knots. Thread three strands of mustard and come up at the first dot. Hold the thread taut with your free hand and wrap it around the needle twice. Insert the needle tip right next to the hole it came up from, a fabric thread or two away, not into the same hole. Slide the wraps down to the fabric and keep holding the thread as you pull the needle through to the back. Repeat for the other two buds.
- Secure the ends. On the back, slide the needle under three or four stitches of the same color and trim the floss close.
Tip
Stop pulling a lazy daisy loop the moment it touches the needle at the tip. One more tug turns a rounded leaf into a thin line. If a leaf already looks thin, unpick the tiny holding stitch, ease the loop wider with the needle tip and anchor it again.
Common Problems and Fixes
| Problem | Likely cause | Fix |
|---|---|---|
| The fabric puckers along the stem | Stitches pulled too tight, or slack fabric in the hoop | Tighten the hoop and pull each stitch only until it lies flat |
| The stem looks angular on the curve | Stitches too long | Shorten them to 1/8 in (3 mm) or less around the bend |
| Leaves come out in different sizes | Tips placed by eye | Bring the needle up exactly on the drawn tip of each leaf |
| A French knot disappears to the back | The needle went down into the same hole | Go down a thread or two beside the hole |
| A French knot is loose and loopy | The thread was released too early | Keep it taut until the last bit of floss passes through |
| The floss twists and tangles | Twist builds up as you stitch | Let the needle hang free now and then so the thread unwinds |
Watch out
Finish off each color before starting the next, and do not carry a thread across open fabric on the back. On pale linen or cotton a long strand behind the work shows through as a shadow. Moving between neighboring leaves along the stem, or between the three buds, is fine.
Variations
- Colors: try a rust stem with terracotta leaves and cream buds for an autumn version, or stitch the whole sprig in one shade of green for a quieter look. On navy or charcoal fabric, switch to pale sage and cream so the stitches stay visible.
- Size: enlarge the outline for a 6-inch (15 cm) hoop and use four strands so the lines keep their weight. Reduce it to about 2 in (5 cm) and use two strands for a collar point or shirt pocket.
- Placement: the sprig sits well in the corner of a napkin, on a tote bag or on the front of a fabric bookmark. Two sprigs, one mirrored, make a simple frame around a name or date.
- Next step: the three-daisy pattern uses the same lazy daisy and French knot on a slightly larger design, and adds stem stitch.
Finishing
Rinse out the transfer lines in cool water if you used a water-soluble pen, let the fabric dry flat, and press it face down on a folded towel so the knots are not crushed. Put the piece back in the hoop with the sprig centered and tighten the screw firmly. Trim the spare fabric to an even circle and gather it at the back. The full method, with an optional felt backing, is in how to finish the back of an embroidery hoop.
Frequently asked questions
Is this pattern suitable for a complete beginner?
Yes. It uses three basic stitches, nothing is filled in solid, and the whole design fits a 4-inch (10 cm) hoop.
How many strands of floss does the leaf sprig use?
Every part is stitched with three strands: deep green for the stem, sage green for the leaves and mustard for the buds.
Why do my lazy daisy leaves look like thin lines?
The loop was pulled too tight. Stop pulling as soon as the loop touches the needle at the leaf tip, then anchor it with a tiny stitch.
Why does my French knot pull through to the back?
The needle went back into the hole it came up from. Insert it right next to that hole, a fabric thread or two away, and keep the thread taut as you pull through.