Geometric Mountain Embroidery Pattern in Straight Stitches
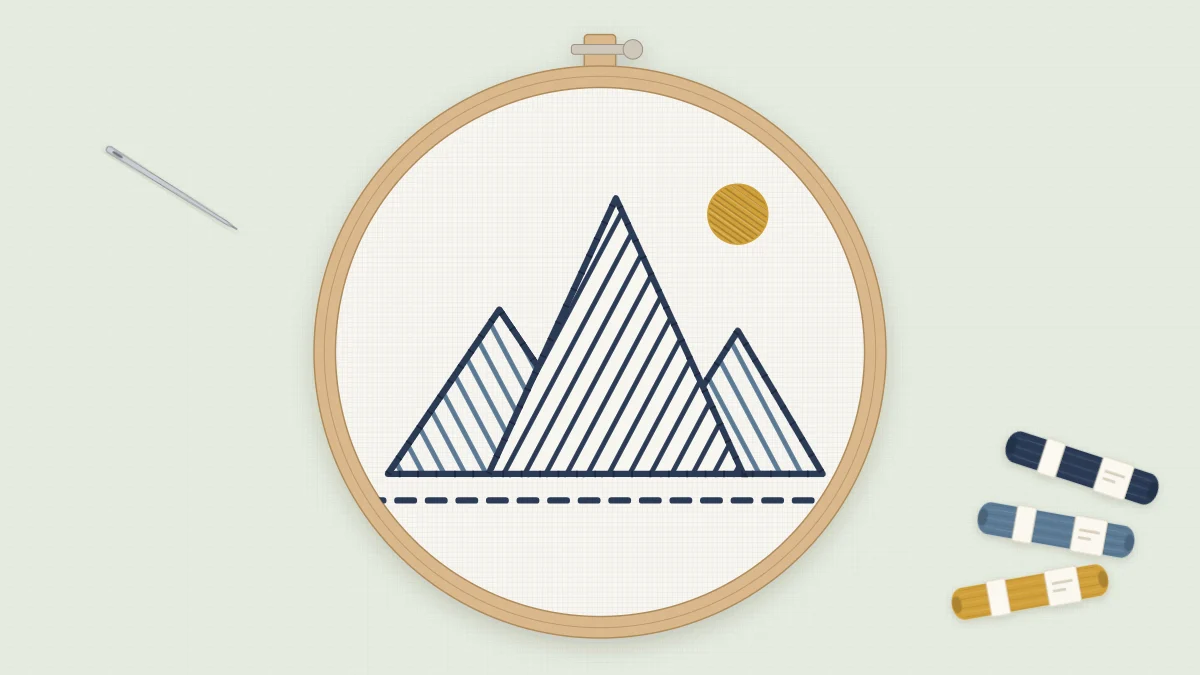
Three overlapping mountains filled with parallel straight stitches, a satin stitch sun and a running stitch ground line, for a 5-inch hoop.
Tutorial at a glance
Materials
- 5-inch (13 cm) embroidery hoop
- White or light gray cotton, about 9 in (23 cm) square
- Six-strand cotton floss in navy, slate blue and mustard
- Embroidery needle with an eye that takes three strands
- Small sharp scissors
- Water-soluble pen and a ruler
Most of this design is made of the simplest stitch there is: a single straight stitch from one point to another. Three overlapping triangular mountains are filled with parallel lines, each mountain slanting a different way, with a small mustard sun to the upper right and one ground line under the peaks. There are no curves to steer around except the sun, which makes this a good pattern for a first or second hoop and for anyone who likes clean, graphic work.
What it teaches is spacing and tension. A straight stitch is easy to make and surprisingly easy to make badly: too tight and the fabric puckers, too loose and the line sags. Stitching a few dozen of them side by side is the quickest way to learn the right pull.
What You Need
- A 5-inch (13 cm) embroidery hoop
- White or light gray cotton, about 9 in (23 cm) square
- Six-strand cotton floss in navy, slate blue and mustard
- An embroidery needle with an eye that takes three strands
- Small sharp scissors
- A water-soluble pen and a ruler
Choose a firm, evenly woven cotton. Long stitches need a stable ground, and a thin or stretchy fabric will pull in under them. The embroidery fabric guide explains what to look for.
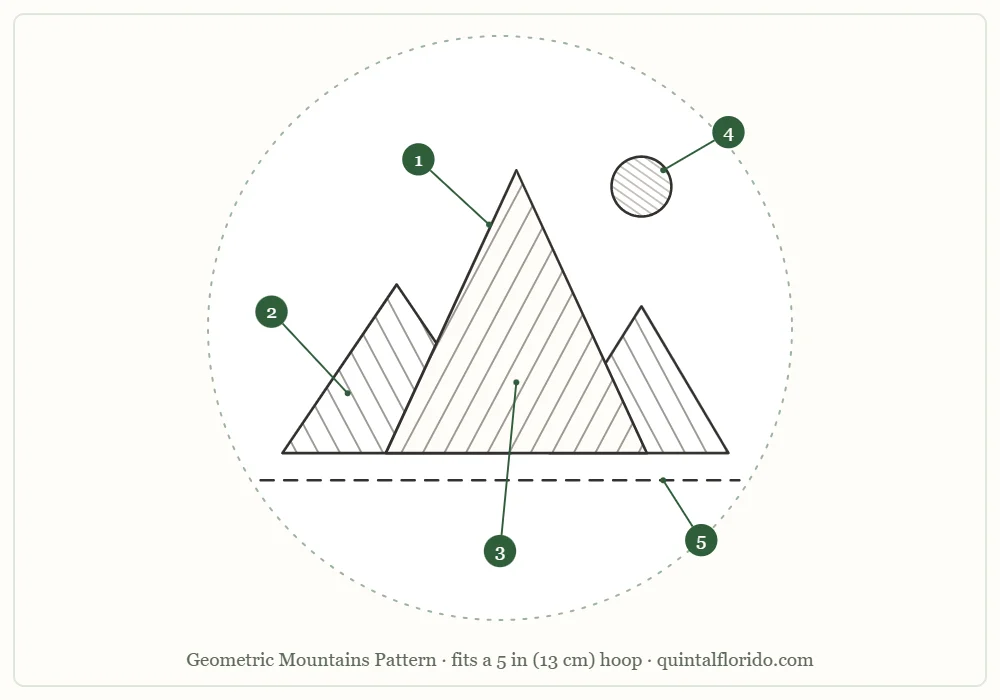
Stitch and Color Key
| Part | Element | Stitch | Color | Strands |
|---|---|---|---|---|
| 1 | Mountain outlines | Backstitch | Navy | 3 |
| 2 | Line fill of the left and right mountains | Long straight stitches, parallel | Slate blue | 2 |
| 3 | Line fill of the middle mountain | Long straight stitches, parallel, opposite slant | Navy | 2 |
| 4 | Sun | Satin stitch | Mustard | 3 |
| 5 | Ground line | Running stitch | Navy | 3 |
The fills use two strands and the outlines three. That difference is deliberate: the thinner fill lines sit back, and the heavier outline frames each mountain.
Transferring the Design
Trace the outline against a window or a lit screen, and use a ruler for every line. Geometric designs show a wobble far more than florals do. Draw each fill line in full, since the drawn lines are your spacing guide. White and light gray cotton are both easy to see through; the guide on how to transfer embroidery patterns covers the alternatives and which pens rinse out.
Line up the ground line with the weave of the fabric before you trace, so the scene sits level in the hoop.
Watch out
Dark thread shows through pale fabric. Do not carry navy floss across the back from one mountain to another or across to the ground line. Fasten off and start again, or the trail will be visible from the front.
Stitching Order
The fills are stitched before the outlines. That way the backstitch runs over the ends of the fill lines and tidies them.
- Left and right mountains (part 2). With two strands of slate blue, work each drawn fill line as one long straight stitch: come up at A on one edge of the mountain, go down at B on the opposite edge. Bring the needle up for the next line on the same side where you just went down. This leaves only short stitches on the back and uses much less thread. Where a mountain overlaps its neighbor, stop the lines at the outline as drawn.
- Middle mountain (part 3). Change to two strands of navy and fill the tall middle mountain the same way. Its lines slant the opposite way from the lines of the two outer mountains, and this change of direction is what separates the three shapes.
- Outlines (part 1). With three strands of navy, backstitch around each mountain. Keep the stitches an even length, about 3/16 in (5 mm), and end a stitch exactly at each peak and corner so the points stay sharp.
- Sun (part 4). Fill the small circle with three strands of mustard in satin stitch. Make the first stitch across the widest part of the circle, work parallel stitches out to one side, then return to the middle and fill the other side. Come up and go down exactly on the drawn line.
- Ground line (part 5). Finish with a running stitch in three strands of navy along the line under the peaks. Make the stitches a little longer than the gaps between them, and keep both consistent.
Tip
Pull each long stitch only until it lies flat on the fabric, then stop. If you run a fingertip across the fill and the fabric ripples, the stitches are too tight.
Common Problems and Fixes
- Fill lines drift out of parallel. Follow the drawn lines instead of judging by eye, and check every few stitches against the first line you made.
- Long stitches sag. Tighten the hoop so the fabric is drum-tight. If a line is still loose, hold it down with one tiny stitch across its middle in the same color.
- The fabric puckers between lines. The tension is too firm. Unpick the last few stitches and work them again with a lighter pull.
- Blunt peaks. A backstitch that runs past the corner rounds it off. Take the needle down exactly at the point, then start the next side from the same hole.
- The sun has a jagged edge. Outline the circle first with small split stitches or backstitches in mustard, then satin stitch over that outline. The raised edge gives the stitches a clean line to wrap around.
Satin stitch and backstitch are both described in detail in the guide to basic embroidery stitches.
Variations
- Colors. Three shades of green turn the peaks into forested hills. Charcoal, mid gray and pale gray with a rust sun give a cooler, more graphic version. For a night scene, stitch in white and pale blue on navy fabric and turn the sun into a moon.
- Line spacing. Lines set closer together make a mountain look darker and heavier; wider spacing makes it lighter. Varying the spacing between the three mountains adds depth without adding a color.
- Size. Scaled up, the fill lines become very long. Above a 6-inch (15 cm) hoop, plan to hold each one down with a small stitch at its midpoint.
- Other uses. The mountain row works on a tote bag or the chest of a sweatshirt. Long floating stitches catch easily on things, so shorten them or tack them down. The guide on how to embroider on clothing covers stabilizing and washing.
Finishing
This is a quick piece; plan on an evening. Rinse out the pen lines in cool water, which matters here because ruled lines sit beside every stitch. Dry the fabric flat and press it face down on a towel. To display it, trim and gather the fabric at the back as shown in the guide on how to finish an embroidery hoop.
Frequently asked questions
Should I stitch the mountain outlines or the line fills first?
Stitch the line fills first. The backstitch outline then runs over the ends of the fill lines and gives each mountain a clean edge.
How do I keep long straight stitches from sagging?
Keep the fabric drum-tight in the hoop and pull each stitch only until it lies flat. A line that still looks loose can be held down with one tiny stitch across its middle in the same color.
How many strands does this pattern use?
Two strands for the line fills, and three strands for the backstitch outlines, the satin stitch sun and the running stitch ground line.
Can I stitch this design on a tote bag or sweatshirt?
Yes, but long floating stitches catch easily in use. Shorten the fill lines or tack each one down with a small stitch at its midpoint.