How to Choose Stitches for Any Embroidery Pattern
Sort every part of a pattern into lines, fills or texture, then let curve, size and use decide the stitch. Includes a decision table for common elements.
Every embroidery design, however detailed it looks, is built from only three kinds of marks: lines, filled shapes, and small textured accents. Once you sort the parts of a pattern into those three jobs, choosing a stitch stops being guesswork. Each job has a short list of stitches that do it well, and three practical questions narrow that list to one.
Sort the Pattern into Three Jobs
Before threading a needle, look at the drawing and give every element one of three labels.
- Lines: stems, outlines, lettering, leaf veins, borders.
- Fills: petals, leaves, bodies, any closed shape meant to read as solid or shaded.
- Texture and dots: flower centers, berries, stars, tiny leaves, scattered specks.
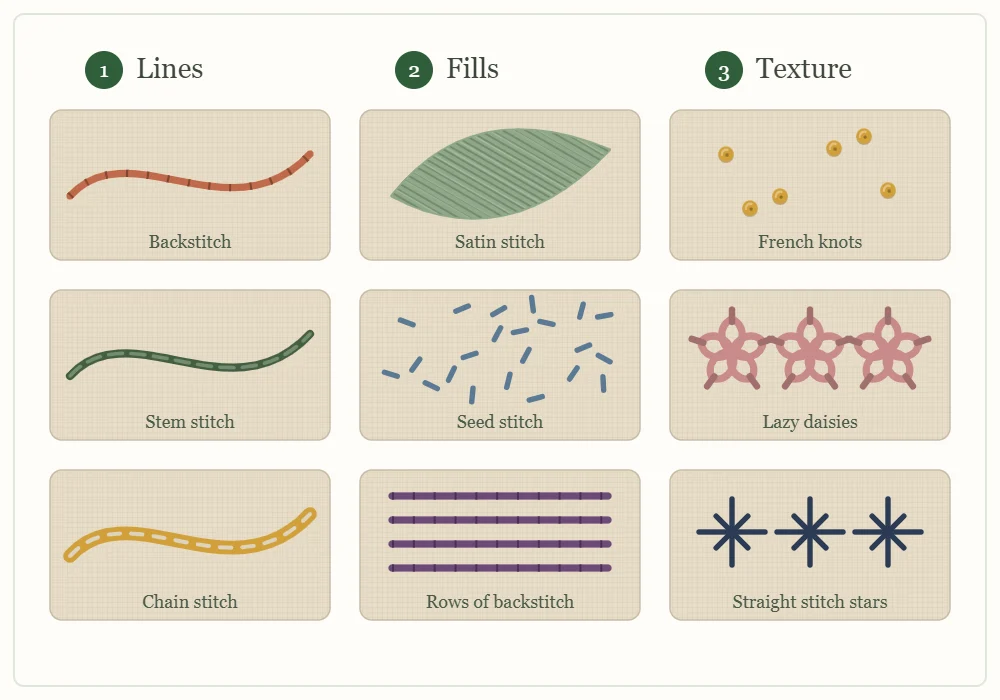
The chart below shows three common choices for each job, stitched side by side so you can compare how much visual weight each one carries.
Stitches for Lines
A line stitch has to follow the drawn path and carry the right weight. The five below cover nearly every outline a beginner pattern asks for, and each one is explained step by step in the guide to basic embroidery stitches.
| Stitch | How it looks | Best for | Keep in mind |
|---|---|---|---|
| Backstitch | Crisp, even, slightly segmented | Outlines, lettering, geometric shapes, tight curves | Shorten the stitches as the curve tightens |
| Stem stitch | Smooth and rope-like | Stems, vines, flowing script | Keep the working thread on the same side of the needle for the whole line |
| Split stitch | Fine, flat, lightly braided | Delicate outlines, small letters, the edge under satin stitch | Easiest with an even number of strands, so the needle can split them in half |
| Chain stitch | Bold, wide row of linked loops | Thick outlines, heavy stems, borders | Uses more floss and reads heavier than the others |
| Running stitch | Light dashed line | Trails, echo lines, quiet borders | Keep stitches and gaps consistent |
To compare these lines on the same curve, look at the modern rainbow pattern, which uses a different line stitch for each of its five arches.
Stitches for Fills
- Satin stitch: parallel stitches laid side by side across a shape for a smooth, glossy surface. It suits small shapes, up to roughly 1/2 in (12 mm) across. Wider than that, the stitches become long, loose and easy to snag.
- Long and short stitch: staggered rows of straight stitches that interlock. Use it when a shape is too large for satin stitch or needs to shade from one color into another. It takes more practice than the others.
- Rows of chain stitch or backstitch: work a line stitch just inside the outline, then another row inside that, until the shape is full. The result is textured, sturdy and forgiving of uneven stitches.
- Seed stitch: tiny straight stitches scattered in changing directions, with fabric showing between them. It suggests a fill without covering the cloth, and it is quick.
Stitches for Texture and Dots
- French knots: raised dots for flower centers, berries and eyes. Wrap the thread around the needle twice and take the needle down right next to the hole it came up from, not into it, or the knot can pull through to the back.
- Lazy daisy: one detached chain loop held by a tiny stitch at its tip. It is a ready-made petal or small leaf.
- Straight stitch: a single stitch from A to B. Use it for rays, grass and tiny petals, and for stars when several cross at one center.
- Fly stitch: an open V caught down by a small stitch. It makes fern leaflets, twigs with paired leaves and tiny birds in a sky.
Tip
When two stitches both seem right, work 1 in (2.5 cm) of each on a scrap of the same fabric, using the floss and strand count you plan to use. Thirty seconds of comparing by eye settles what reading about stitches cannot.
Three Questions That Narrow the Choice
How tight is the curve?
Gentle curves suit any line stitch. As a curve tightens, a long stitch cuts across it and the line turns angular. Backstitch and split stitch cope best, because you can shrink them to about 1/16 in (2 mm) without losing their look. Stem stitch handles moderate curves well if you shorten it. Chain stitch is too wide for very small curls, where its loops blur the shape.
How big is the shape?
A leaf 3/8 in (1 cm) long is one lazy daisy. A leaf twice that size can be satin stitch, ideally worked in two halves that meet along the center vein. A shape several inches across needs long and short stitch, rows of a line stitch, or an open seed stitch fill. Scale changes the answer even when the shape stays the same. Strand count changes it too, so check how many strands to use before deciding a line looks too thin or too heavy.
Will the piece be washed and worn?
Hoop art hangs on a wall and is rarely touched, so long satin stitches and loose loops are safe there. Clothing and table linens are washed, pulled and rubbed, so favor short, well-anchored stitches: backstitch, split stitch, chain stitch and firmly made French knots. The guide to embroidering on clothing covers this in detail.
Watch out
A satin stitch longer than about 1/2 in (12 mm) on a garment will catch on jewelry, zippers and fingernails. Break the shape into narrower sections, or fill it with rows of chain stitch.
A Decision Table for Common Elements
| Element in the pattern | Best first choice | Alternative |
|---|---|---|
| Gently curved stem or vine | Stem stitch | Backstitch |
| Tight curl or spiral | Backstitch with very short stitches | Split stitch |
| Straight geometric outline | Backstitch | Split stitch |
| Small lettering | Backstitch | Split stitch or stem stitch |
| Bold outline or thick stem | Chain stitch | Stem stitch with more strands |
| Small leaf or petal | Lazy daisy | Satin stitch |
| Small shape filled solid | Satin stitch | Rows of backstitch |
| Large shape filled solid | Long and short stitch | Rows of chain stitch |
| Light, open fill | Seed stitch | Rows of running stitch |
| Flower center or berry | French knot | Cluster of tiny straight stitches |
| Star or sparkle | Crossed straight stitches | French knot |
| Fern frond or twig with paired leaves | Fly stitch | Pairs of straight stitches |
| Dashed trail or echo line | Running stitch | Backstitch in a paler color |
Reading an Unlabeled Pattern
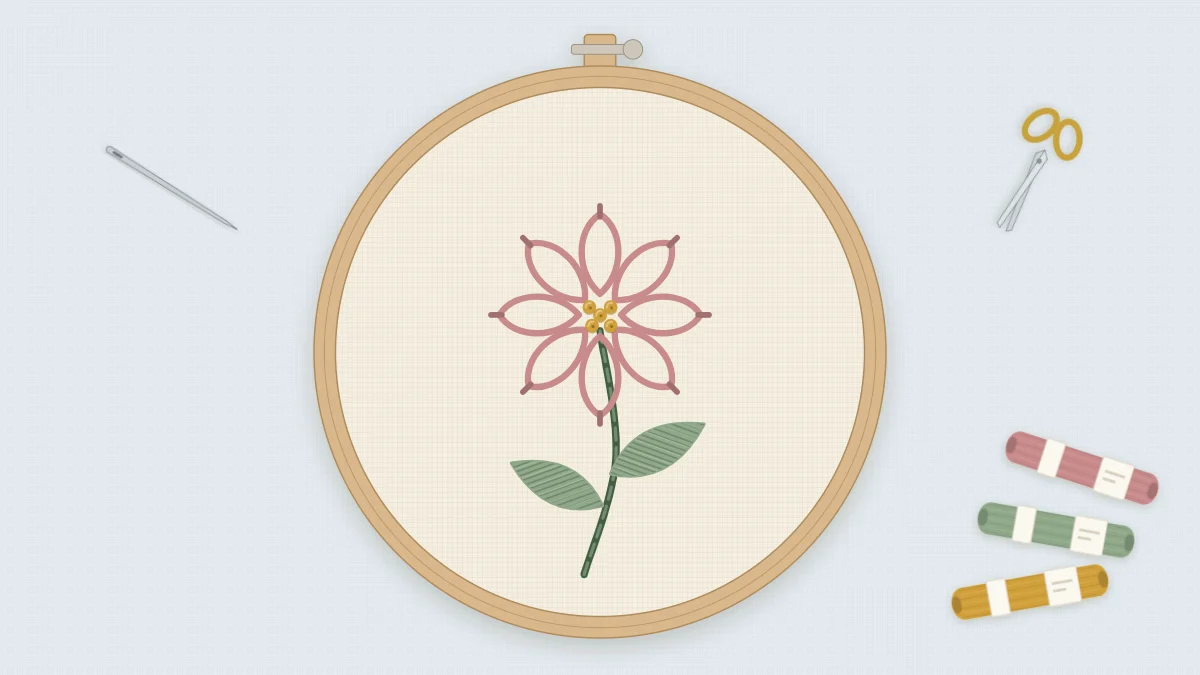
Many designs arrive as a bare outline with no stitch key. Treat that as freedom, not as a missing page. Take a simple flower with a curved stem and two leaves, like the one pictured at the top of this guide, and run through the same checks in order.
- Label the jobs. The stem is a line, the leaves are fills, and the petals and center are texture.
- Check the curve. The stem bends gently, so stem stitch gives it a smooth, rope-like line.
- Check the size. The leaves are small enough for satin stitch. The petals are short loops, which is exactly what lazy daisy makes.
- Check the use. In a hoop, the satin leaves are safe. On a shirt pocket, swap them for lazy daisy leaves or a backstitch outline.
- Finish with the dot. One French knot fills the center.
The same five checks work on any design, whatever its subject. Text is a special case of line work, with its own rules for letter height and strand count, covered in embroidery lettering basics. For everything else, name the job, measure the curve and the shape, think about washing, and the stitch nearly chooses itself.
Frequently asked questions
What is the best stitch for outlining in embroidery?
Backstitch is the most reliable first choice, because it stays crisp on straight lines and can be shortened for tight curves. Stem stitch is a good alternative for stems, vines and flowing script.
Which stitch should I use to fill a shape?
Use satin stitch for small shapes up to roughly 1/2 in (12 mm) across. For larger shapes, use long and short stitch or rows of chain stitch, and use seed stitch when you want a light, open fill.
Which embroidery stitches hold up best on clothing?
Short, well-anchored stitches last longest in the wash: backstitch, split stitch, chain stitch and firmly made French knots. Avoid long satin stitches, which snag easily.
What do I do if a pattern has no stitch guide?
Label each element as a line, a fill or a texture detail, then check how tight the curves are, how big the shapes are and whether the piece will be washed. Those checks point to one or two suitable stitches for every part.